We are Jake & Kiva and we have been building our tiny house on wheels for over two years. Most people are stunned by how long it has taken us, since you often read stories of tiny houses being built in just a few months! But our journey has been anything but straight-forward. Our project […]
Saturday, October 22, 2016
Wednesday, October 19, 2016
Top 5 Things To Know About PreFab Homes
Prefab can be a confusing term. A large number of people think prefab construction is the same as kit construction or panel construction. In some ways it is but for the most part, it is not. According to Wikipedia prefabrication is the practice of assembling components of a structure in a factory or other manufacturing site, […]
Tuesday, October 18, 2016
The Greenmoxie Tiny House
Greenmoxie was started as a green living blog about five years ago in a quaint little town called Warkworth, in Ontario Canada. In our pursuit of all things green, we thought building a tiny sustainable house would be something we needed to explore. In September 2015 we began drawing our plans for tiny house build. […]
Monday, October 17, 2016
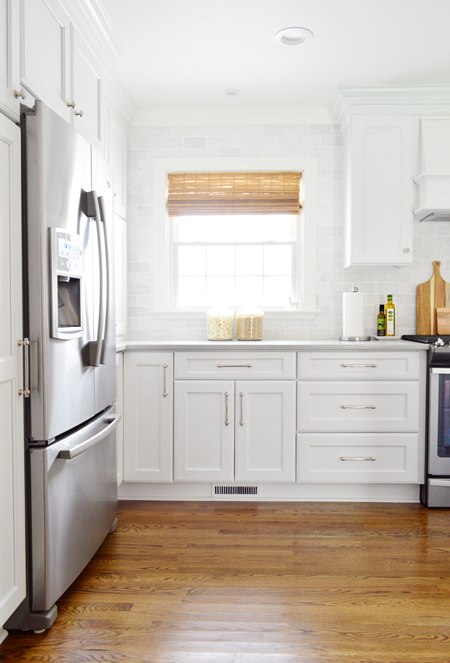
Kitchen Remodel Chapter #3: The Big Reveal
Want a full tour of our newly renovated kitchen in 4,390 words or less? Well settle in and sip some LaCroix, because this is the post for you.
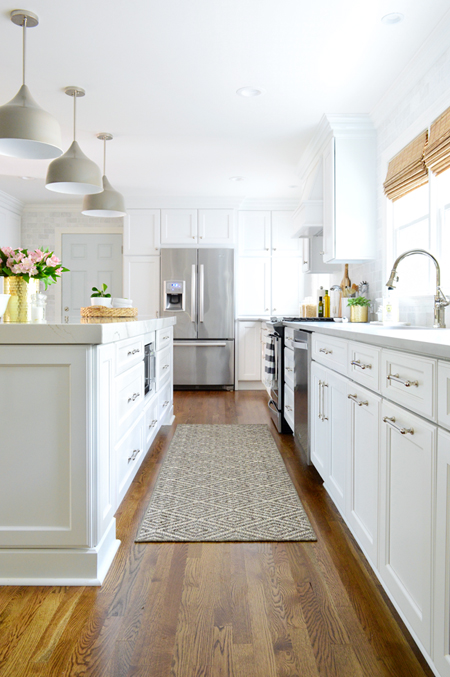
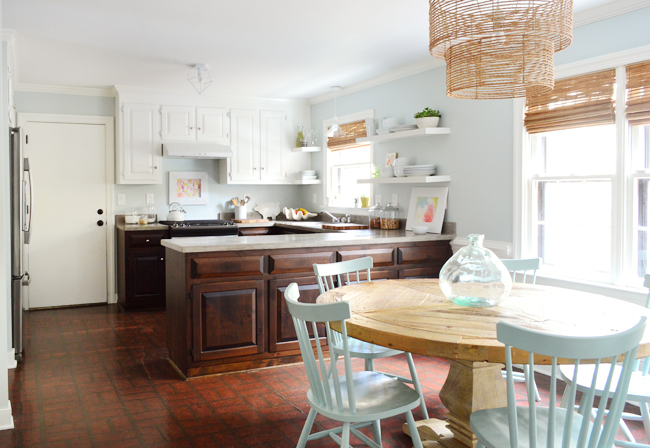
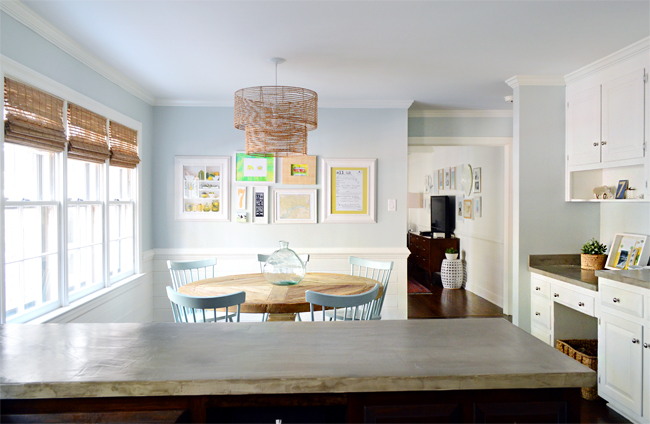
Shall we begin with a few before and afters? You probably remember this view from our living room where you couldn’t actually see the kitchen.
Well, now it looks like this:
And here’s the old view from the other side, which is what you saw when you stepped in the door from the garage.
These days it’s looking a little different.
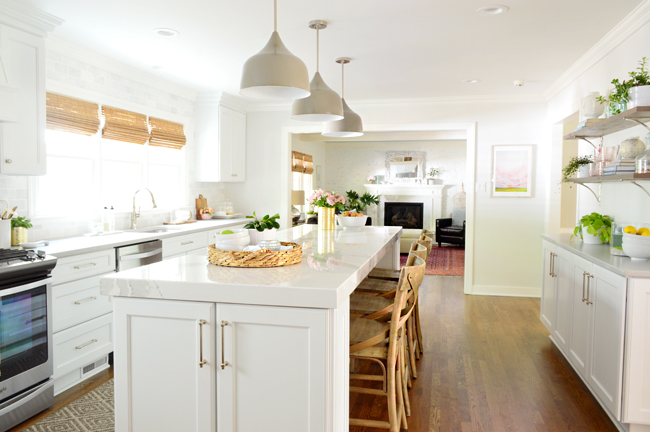
There’s obviously TONS of stuff to cover about this space, but today our main goal is to dish out lots of after photos and tell the story behind the major material choices that we made in the room (since we previously covered planning the layout and gutting & rebuilding). So let’s start with the cabinets.
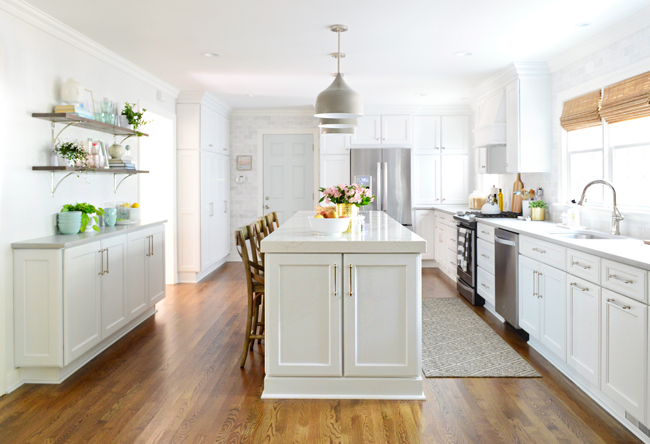
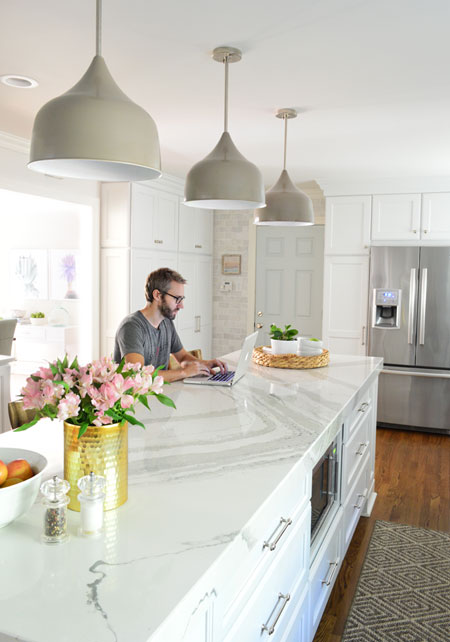
Cabinets
You guys know we’re suckers for a white kitchen (we did one in our first and second house and loved ’em). So there wasn’t ever much doubt in our mind that it’s what we’d do here – especially since the trees in our backyard block a fair amount of morning light in here, and well: white cabinets = maximum brightness.
Side note: this week’s podcast, episode #20, is all about white walls (are they overdone? Played out? Still awesome? Only pretty in photos but stark in person? We interviewed two other bloggers about it, and weighed in ourselves).
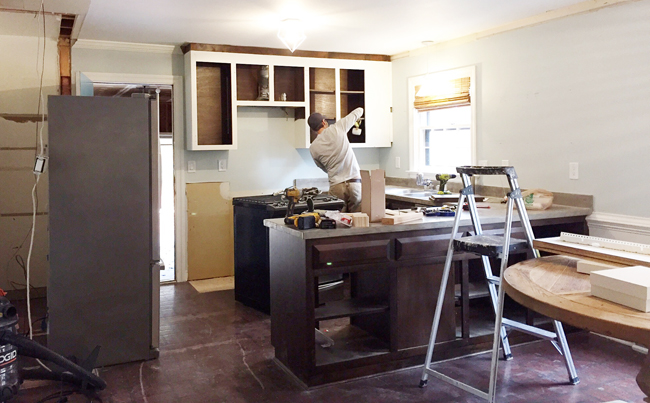
As we mentioned in our last kitchen post, we decided to order our cabinets through a local company called Chesapeake Bay Cabinet Company. We’ve worked with them on builder spec homes, so it made sense to collaborate on our own house since we enjoy working with them and love their finished product. We considered a few brands of cabinets that they sell, but ended up going with Quality Cabinets for a number of reasons: nice solid craftsmanship, soft close drawers that come standard, and being able to upgrade to a 5 piece drawer (one with a recessed panel instead of a flat front).
We also appreciate that their stock white cabinet color is a nice crisp white with only a tiny hint of gray. Sometimes stock white cabinets can skew more yellow or blue/gray than you might prefer, so bringing home a sample door to make sure it doesn’t clash with all of your house’s white trim (or your counter/tile selections) is always a good call. Even though we love a clean-lined shaker door, we went with a fairly traditional door style with a double beveled edge because it felt like it added a little something extra while fitting the character of our house.
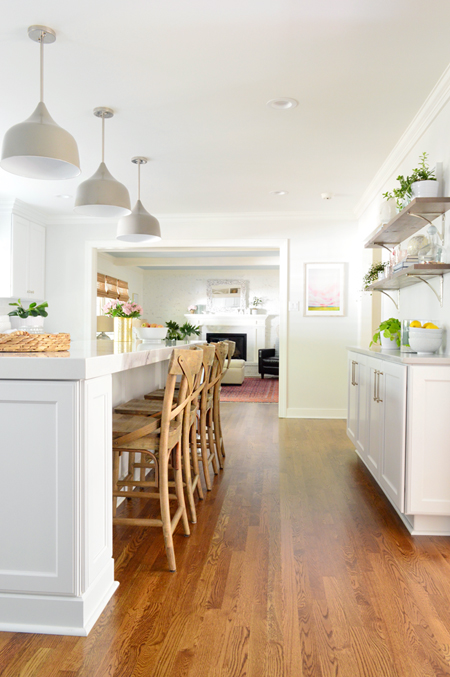
We’ll get more into how we organized and arranged the cabinets in another post, but we went with A LOT of drawer bases. Almost the whole island is basically big, deep, drawers. I know. Hubba, hubba.
Some of you might be wondering why we didn’t do an Ikea kitchen. While we’ve used (and loved!) Ikea cabinetry in our laundry room & our bonus room, for such a big project where we’ve already mentioned that speed was a motivating factor, we thought these were our best choice. Our experience with Ikea is also that it takes some ingenuity to pull off some of the finishing touches (trim, filler strips, etc) to make sure everything looks balanced and fully fills the space you want it to fill (remember this?). So we just felt more confident working with our local guys to make sure we could pull off everything we wanted to do in here.
Counters
Having worked with several materials by this point (granite, corian, marble, laminate, and even concrete) we actually knew pretty quickly that we wanted to go with quartz. Quartz is a man-made counter that utilizes natural quartz to look and feel like real stone, while dodging some of real stone’s hassles (it’s less prone to scratching and doesn’t need to be re-sealed). It’s non-porous, so it stands up better to juice, oil, wine, tomato, coffee and other kitchen stains along with not holding onto bacteria, like raw chicken goo. So since we plan to be here for the long haul (and, well, #kids) it felt like the smartest choice for us. Plus you already heard how their 11ft super slabs solved our island size conundrum.
We were initially attracted to a Cambria quartz style called Ella, which is white-ish with some subtle movement that mimics marble (it looks sort of like Carrera) so it felt like a solid choice #counterpun. But then we came across a slightly bolder design called Brittanicca, which has a more pronounced pattern with a bit more contrast and wider, larger-scale veining.
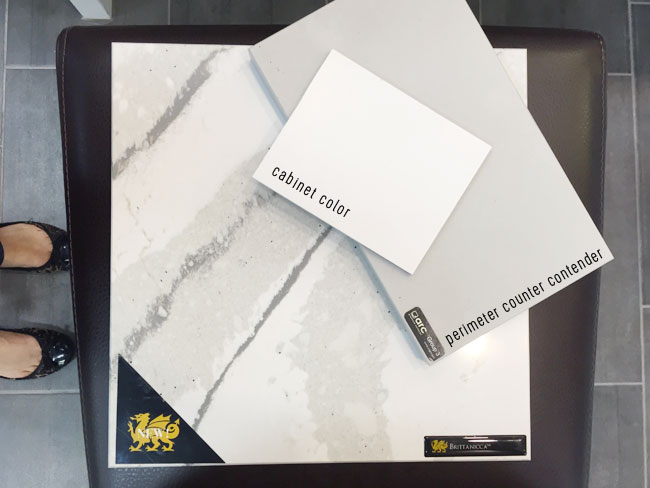
Although the sample of it was surprisingly large, we knew it was too big of a decision to make without seeing a full slab in real life (we’ve been down that road before). So we went to a few local stone yards and fabricators until we could lay our eyes on a nice big slab of it. And when we finally tracked one down in person, we knew it was the one. We thought the thicker, larger-scale veining would make for a nice accent in the middle of the room. Especially when paired with a softer more concrete-like choice on the perimeter cabinets.
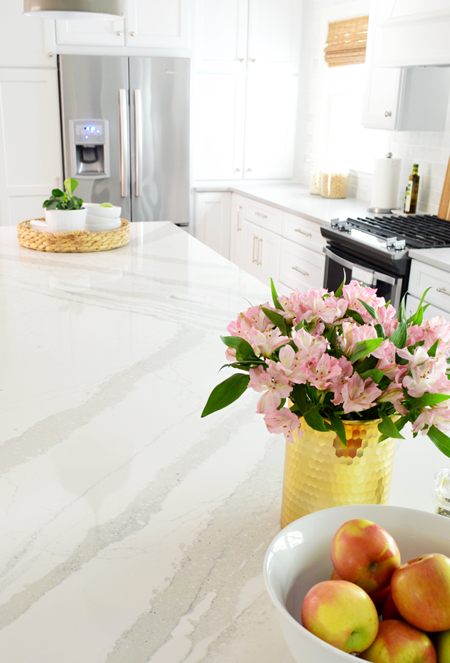
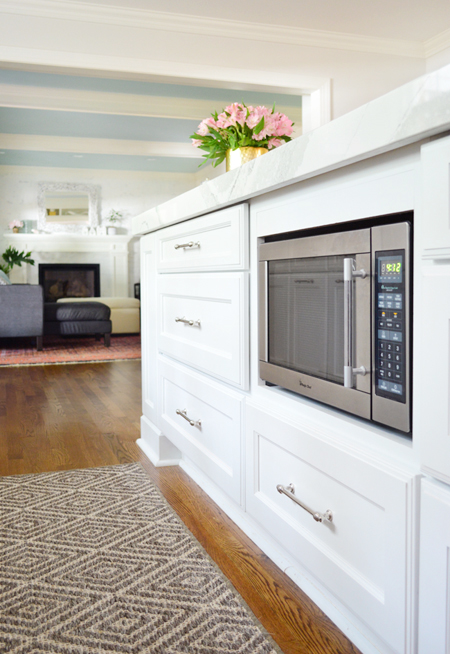
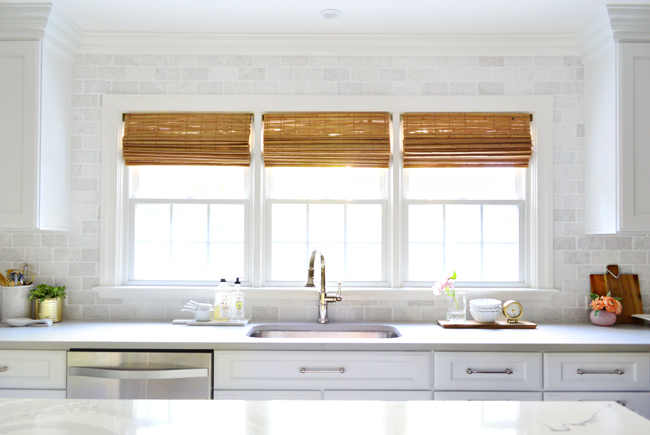
We also literally “went big” with the island and chose to do it triple-thick (3″ vs. the standard 1.25″ profile). With such a large island (that beast is 10′ long) we thought it might look extra cool with something more substantial on top. It’s one of those “special choices” that we initially worried wouldn’t register nearly as much as something more obvious and statement-y… you know, like a bold look-at-me paint color or a giant chandelier. So we had a few “will this choice even be noticeable?” discussions where we almost backpedaled and decided not to bother. But all that worry vanished as soon as it was installed. It’s one of our favorite things about the entire remodel, and it’s the #1 thing people comment on when they walk in.
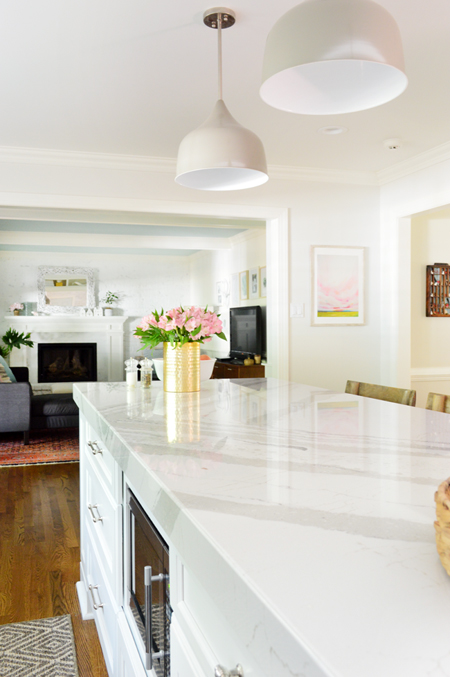
The secret is that it’s not actually extra thick. Whenever someone asks how it’s done, we liken it to the lid of a shoe box. It just has side pieces around the edges that were mitered and glued to look as if it’s truly a super thick solid slab. And since they were able to cut all the sides from the same slab, the only extra cost was for fabrication – not extra material. You can also see from the photo below that it sits atop a big piece of thick plywood, which snugly supports the slab. And yes, it took SIX guys to carry it in. Not because it’s so heavy (well, it is heavy) but mostly because the original four guys that showed up were having trouble getting a good grip on the thicker edge, so they called in two more guys for backup.
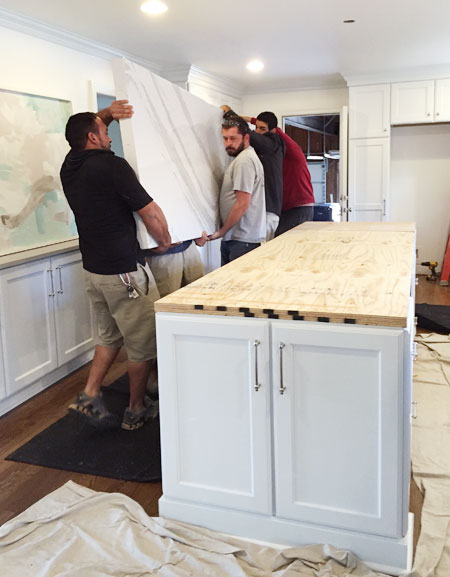
Side note: the island veining is always harder to see in photos than in real life since it’s so shiny and reflects the white ceiling in pics, but that photo above, of the guys carrying it in, actually captures it pretty well. It’s definitely not mostly white looking. The veins are large and in charge and impossible to miss when you see it in person.
Oh and the first fabricator we visited said we’d need a seam in our island, not because they didn’t have a big enough slab, but because they didn’t think it could be transported into the house. So we got a second opinion from a second local fabricator and they told us they’d happily send more guys to carry it if we wanted something without a seam. They also had an extra thick mitered counter right in their showroom, so we knew they could pull off the look. The lesson here? Don’t stomp on your dreams based on just one opinion. Also, in the ever-wise words of Selena Gomez: the heart wants what it wants.
For the perimeter counters, we liked the color of our previous concrete-covered counters so much that we decided to go with a quartz that mimicked them. So we brought some samples home from a bunch of different makers to see how they compared.

The winner was the bottom-middle one, since its warm undertones matched the warmth of Brittanica’s veining. It’s called Ice-Zement, by Compac. The cool thing is that it comes in a gloss or a matte finish, so we went with the matte one since it’s more like concrete and allows the shiny island to stand out in its own right. Oh and we ordered the perimeter quartz from a different fabricator because they were running a better deal on that color. So it’s just another reminder to shop around!
Hardware, Faucet, & Shelf Brackets
As popular as brass and gold are these days, we felt more confident that we’d like a polished nickel tone in here for the long haul, so we went with that for all of the “permanent” fixtures. And although I had pinned LITERALLY TEN MILLION BRIDGE FAUCETS, we ended up with a nice functional pull-down faucet with one handle, because John is the function police and he said it would have bugged him (and probably me) to have to use two handles to adjust the water temperature instead of one. In the end I love this faucet, so don’t tell him this, but he was right.
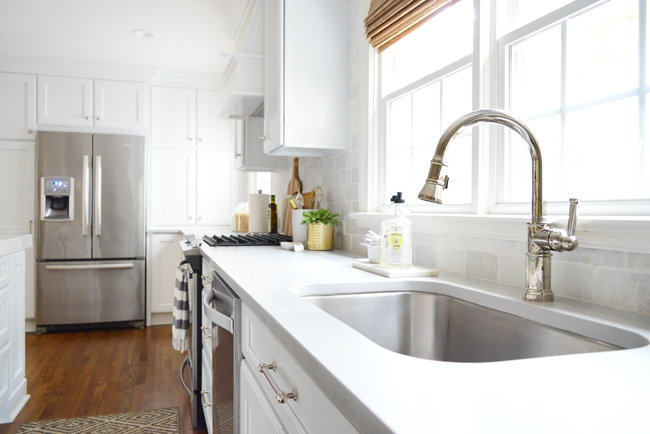
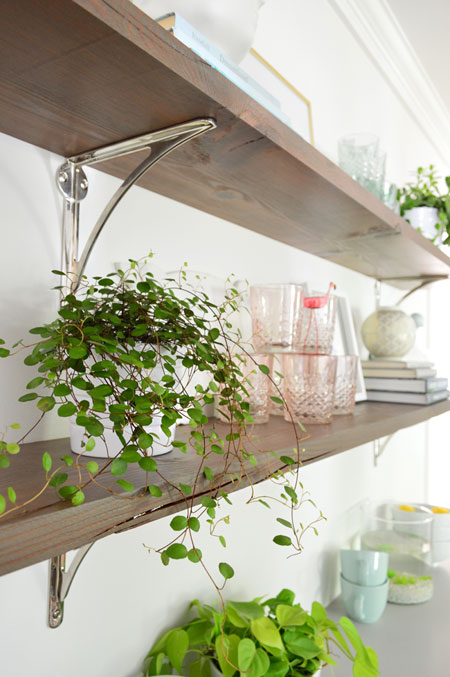
We also went with polished nickel shelf brackets and cabinet hardware, which both feel nice and weighty and solid. Polished nickel has a slightly warmer undertone than chrome (see the almost-gold hints in our shiny faucet above?) while chrome has more of a shiny-blue undertone that feels cooler. Both are pretty, but between the wood floors, woven blinds, and some of the warmer veining in the island, we thought some subtle warmth in the metal would be nice.
One thing we kind of agonized over was deciding which cabinets got pulls (handles) and which ones got knobs. We eventually settled on all the cabinets above the counter getting knobs, and everything that went below the counter getting pulls. And to make life somewhat easier, everything that earned a pull got the same sized pull.
New Book: Prefabulous Small Houses with Foreword by Robert Redford
To people who are unfamiliar with the new home industry (including tiny homes), the word “prefab” has a negative, bargain-basement connotation. Modular, prefabricated homes have come a long way in the last decade and author Sheri Koones’ new book shows the best of “prefabulous” small homes. Prefabulous Small Houses is the latest book by author […]
Sunday, October 16, 2016
The Future of Tiny Housing and the IRC
Likely by now you’ve heard of the proposed tiny house code for IRC 2018. But what are its implications for the future of tiny housing in America? Andrew Morrison, the tiny house luminary behind this historic effort, recently joined us on Tiny House Expedition Radio to discuss the nitty-gritty of the proposal, what it includes and […]
The Big Adventures of Tiny House
What Do a Traveling Tiny House, a New Children’s Book & a Tiny House Village have in Common? Find out in a recent episode of Tiny House Expedition Radio! Eight months ago in southern California, Christian and I first met Kevin Polk and his life partner and children’s author, Susan Bernardo. It was the beginning […]
Saturday, October 15, 2016
Ontario Lakeside Cabin
Guest Post by Andrew Macklin My family and I have been self building our off grid small home for the past 4 years. I have been documenting the process on youtube and I thought you might be interested in it for your blog. Our off grid, water access cottage is just over 500SF the minimum […]
Friday, October 14, 2016
10 Tiny Houses for Sale in Colorado
Ready to buy a tiny house in Colorado? Look no further. Get ready for snow in July, legal Mary Jane and some of the beautiful views of mountains and forests available anywhere in the world. If you want to contact the seller of any of these homes, just click the name of the tiny house […]
Thursday, October 13, 2016
Living, Breathing, and Building Wind River Tiny Houses With Jeremy Weaver
Ladies and Gentlemen, meet the one and only builder (that we know of) who actually lives in a tiny house on wheels and builds them as well! I know. No way!? Here at the podcast we have a bit of a tongue-in-cheek approach to “posers”. (aka: People who are active in the tiny house movement […]
Wednesday, October 12, 2016
How To Best Organize Your Tiny House Kitchen
After living in a small space for over 5 years now one thing has become completely obvious. While kitchens are essential, the ones that stocked like the clearance section of Bed, Bath and Beyond, are not. There are so many tools and gadgets available to the novice cook that one can easily get blurry eyes […]
Tuesday, October 11, 2016
The Back-to-Basics Kozy Kabin Tiny House Plans: Dee Williams’ Home!
Many tiny home designs today are racing to offer bigger homes with more features and gizmos. You can find tiny houses with hot tubs, saunas, and climbing walls these days – practically anything you can also find in a “big house.” But a lot of folks look to tiny homes for something simpler and more […]
Monday, October 10, 2016
Kitchen Remodel Chapter #2: Gutting & Rebuilding
Hopefully, by now you heard that we redid our kitchen. We shared how we landed on a completely new layout last week. But moving things around on paper is one thing, so today we’re taking you through how things happened in real life – including how a certain wall came down to get that open view into our living room.

This kitchen was our biggest renovation project to date, and it fell somewhere in the middle of the DIY spectrum. It wasn’t entirely hired out (like our first kitchen mostly was) and it wasn’t completely DIYed (like our second kitchen mostly was). For some tasks, we decided that minimizing time was more important, so hiring professionals was the best choice. And for others, minimizing cost won out – so we took them on ourselves, especially when they were things we enjoy doing or can do quickly ourselves. With this being our third kitchen reno, we have a much better sense of what tasks we’re suited for and what things we’d rather delegate in the name of not being kitchen-less forever. You can hear a lot more on this topic on this week’s podcast, Episode #19, but enough chitchat – let’s get to the pictures!
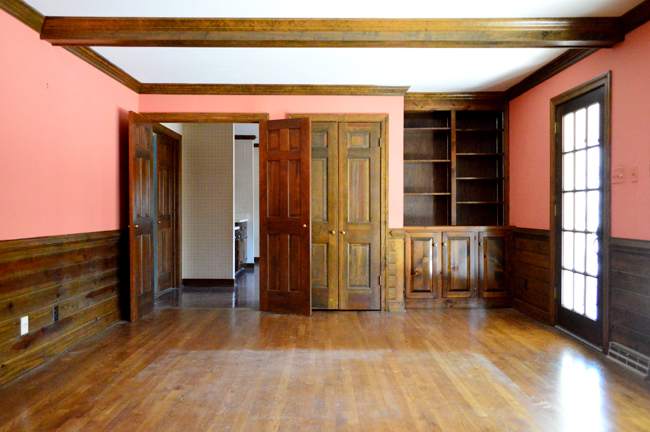
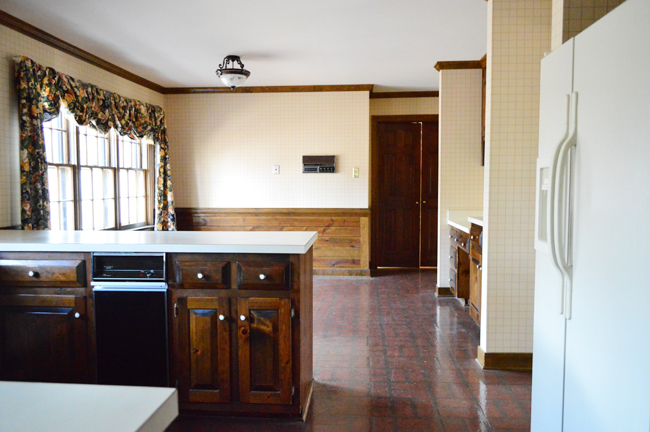
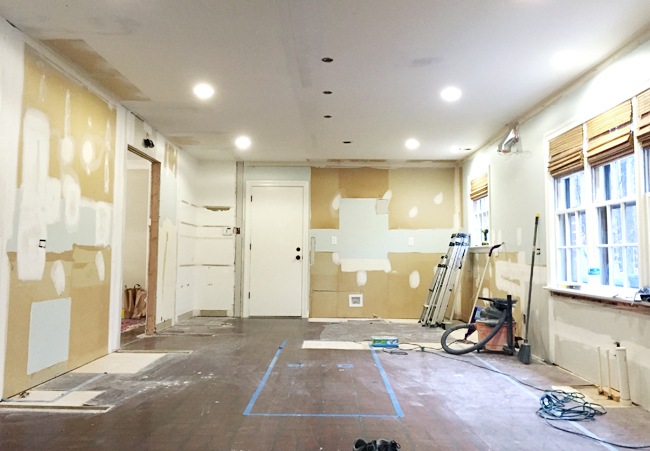
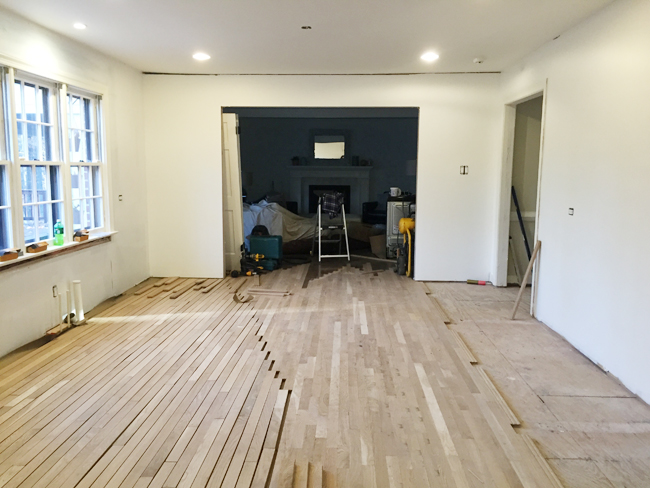
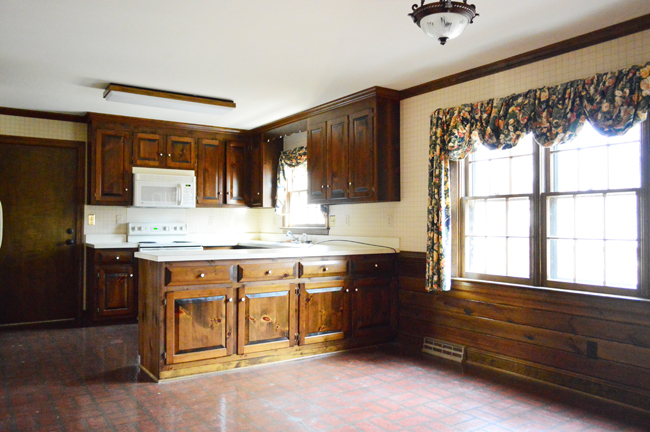
First, some befores. These are waaaay befores from when we moved in. These are the two vantage points you’ll see through most of this post (and boy are they going to change!). The first one is this angle from our garage door looking toward the living room:
And the second one is this view from our living room looking back towards the kitchen. Which of course, in this shot, is obscured by the wall with the bookcase and old wet bar (which is behind by those closed double doors in the picture below). We were a little sad to lose the built-in bookcase, but we already had a plan brewing to replace them. And that dated, never-used wet bar? Not sad to see him go. Not one. teency. bit.
As you know from the last post, the floor plan we ended up going with involved opening up this wall to create better flow and clearer sight lights between the kitchen and the living room. Shortly after we moved in we had a contractor confirm that wall wasn’t load bearing, so we didn’t have to think twice about busting it down ourselves.
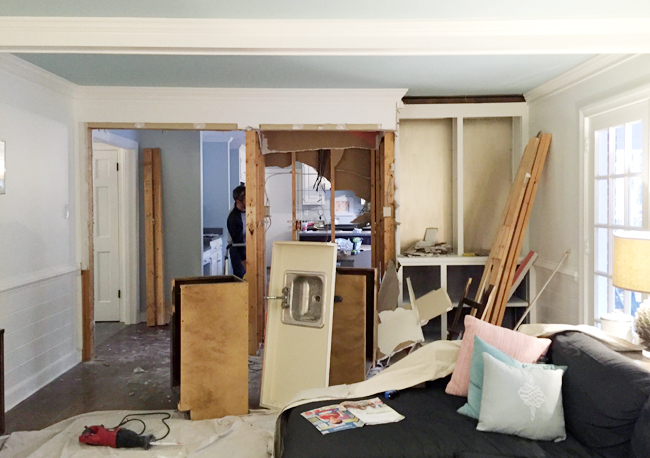
We did all of the demo, since it’s a relatively easy task and it’s also kinda fun. Let me tell you, it was ridiculously satisfying to suddenly see the living room while standing at the kitchen sink.
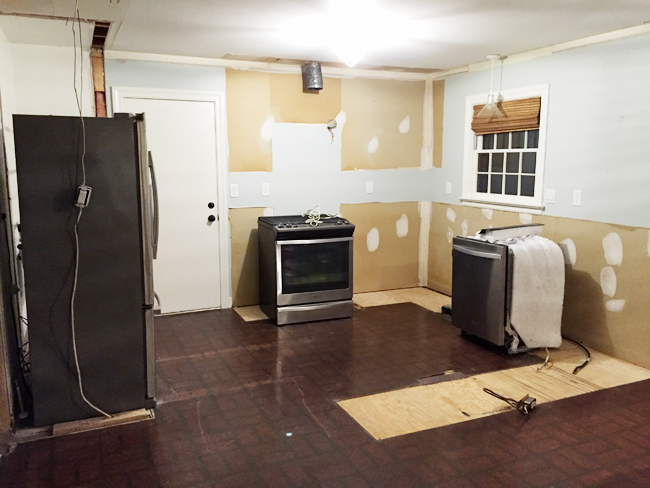
By the end of the first afternoon, we had that wall mostly down and the desk area in the kitchen removed. We couldn’t fully remove the main cooking area until a plumber and electrician rerouted/terminated some pipes and wires, so instead of half removing it (and living without a kitchen sink for even longer) we left that area of the kitchen intact for as long as possible. Hi Burger.
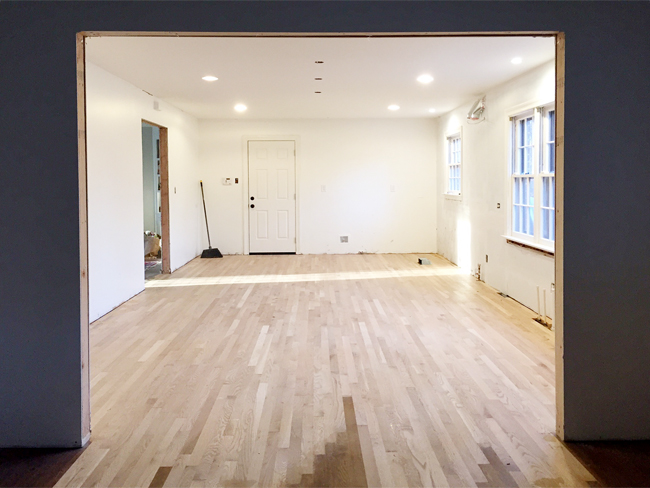
Oh, and that shot above is a good demonstration of why we moved away from our original idea a to turn that triple bay of kitchen windows into french doors out to the deck (longtime readers might remember us mentioning that idea when we first moved in). You can see there’s already a door that leads out to the deck in the living room, so adding more doors just a few steps away felt like overkill – especially with the wall down. Plus, leaving them as windows made room for more counter/cabinet space AND allowed Sherry to realize her dream of a kitchen sink centered under a giant bay of windows:
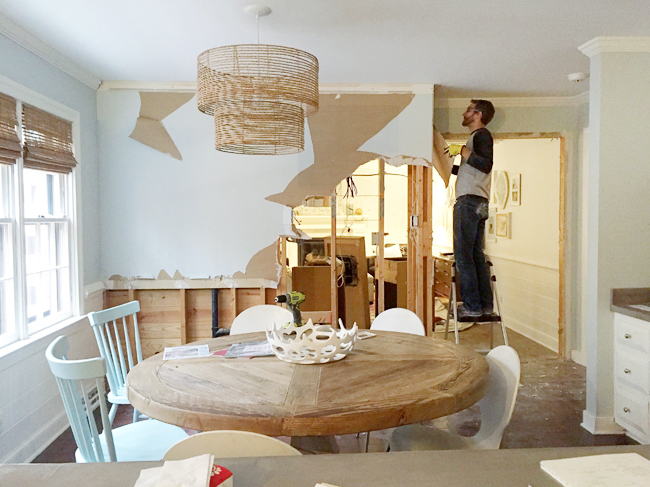
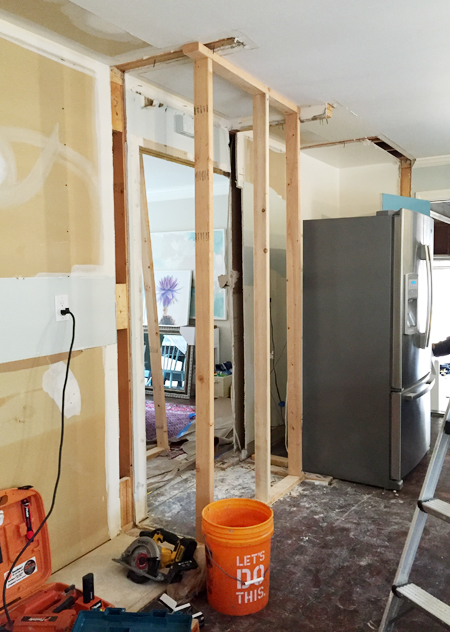
But back to the process. The day after we demoed out that living room wall and the kitchen desk area we had a contractor come to help us with some framing – mostly widening the doorway to the dining room. This wall WAS load-bearing, so we always like to rely on professionals in those situations. Here’s the temporary support he built to hold up the joists while he installed a new header for the doorway.
Going through all this trouble to widen a doorway about a foot may seem insignificant, but it went a long way in helping the rooms feel more connected. This isn’t a perfect before and after, but here’s what the doorway looked like right before the reno started…
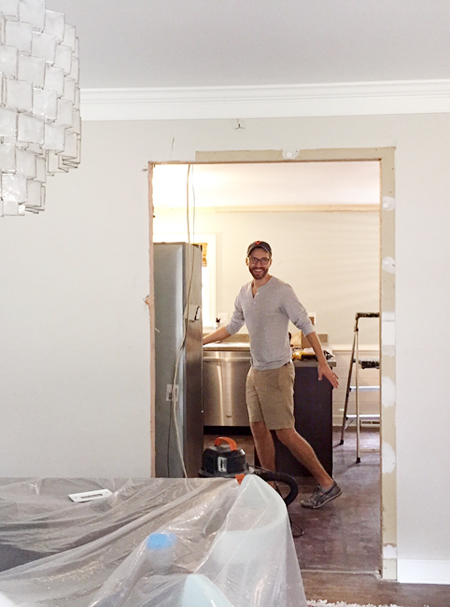
… and here’s that opening from the other side (dining room into kitchen) after we widened it. I mean, clearly I’m happy about it.
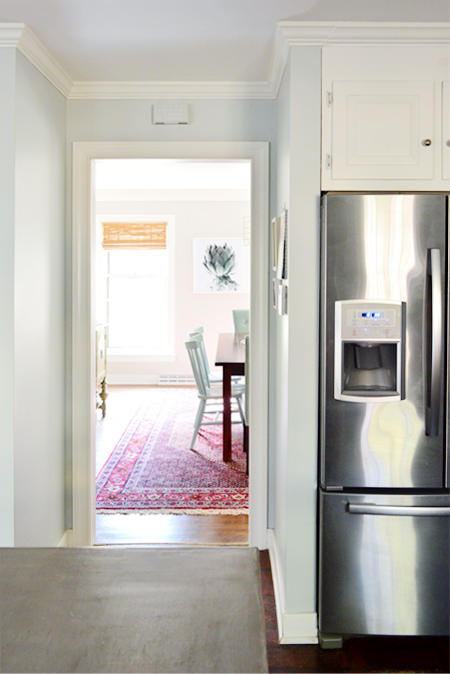
The other reason we wanted to change that doorway was so that it would be the same size as the adjacent doorway that connects the kitchen to the foyer. So now when you stand in the kitchen, they look a lot more balanced.
While the contractor worked away on the framing (with the plumber and electrician scheduled to arrive soon), we jumped back into kitchen demo. Sayonara functioning kitchen!
No sink = things just got real.
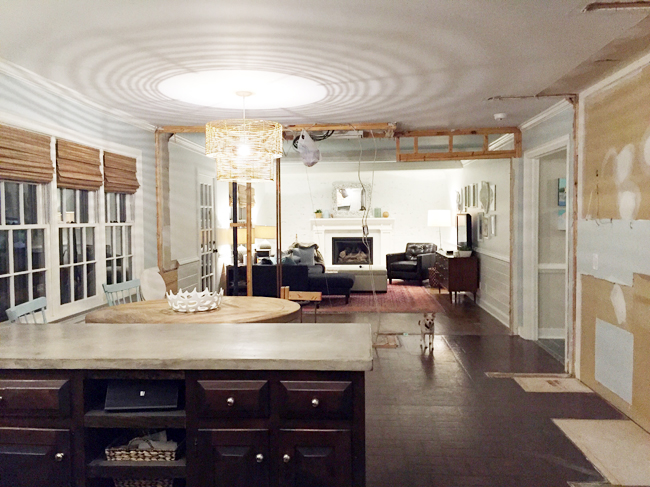
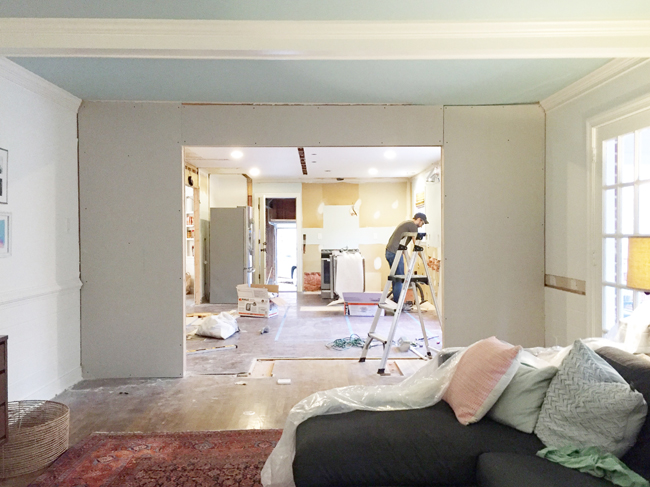
Fast-forward a day or so and our plumber had terminated the old pipes and the gas line to the stove along with running new ones in the new locations. Our electrician also got rid of old wiring and ran new stuff, including adding some recessing lights and boxes for pendants in the ceiling. And we finally began framing the new opening to the living room (the contractor who widened our dining room doorway helped us frame it up so we could fly through this part faster).
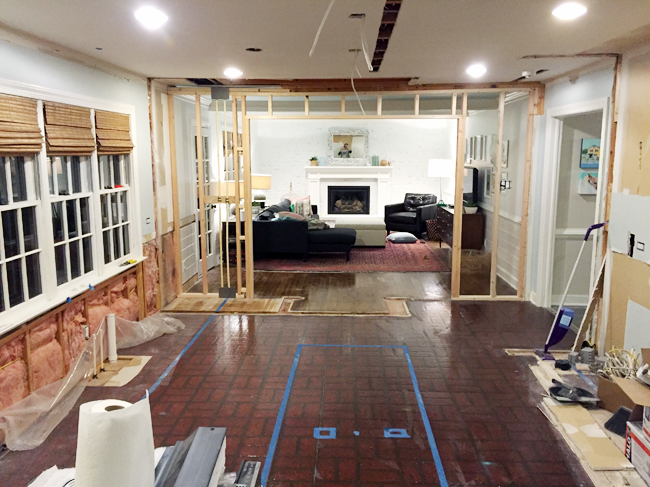
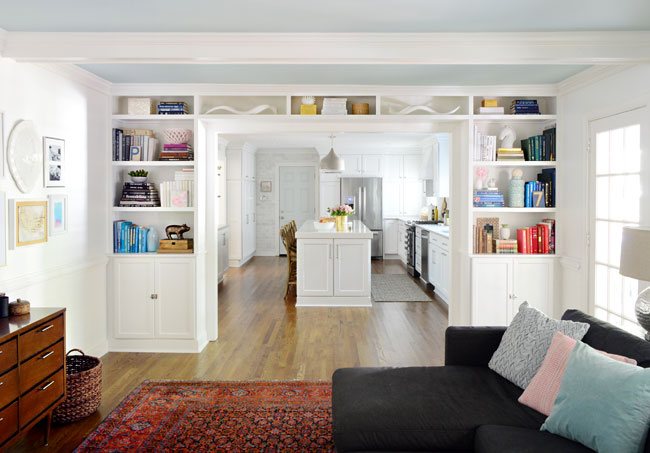
As cool as it was seeing the two rooms completely open to each other, we knew having some sort of cased opening – even a big one – felt more natural to the house and would also give us a place for the cabinets to terminate into (otherwise we’d just see the end of the cabinets from the living room). Plus, we needed some wall space in the living room to add back some built-ins.
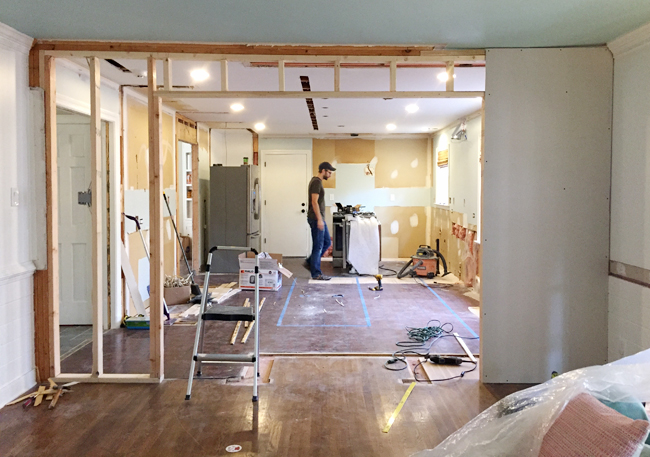
The drywalling process is actually an interesting example of how we balanced DIY & contracted work. We can drywall. But we don’t enjoy it and we aren’t particularly fast at it – especially the mudding & sanding part. So we negotiated that we would buy & hang all of the drywall and we would mud & sand all of the spots that would eventually be covered by cabinets or tile or built-ins (two whole walls fell into that category) – since they wouldn’t need to be perfect. That meant we only paid for a few hours of mudding/sanding from a pro to finish the areas that would be visible – like the long strip on the ceiling (which can be especially tricky to get smooth). The compromise saved him time, it saved us money, and we still got a professional finish everywhere it counted.
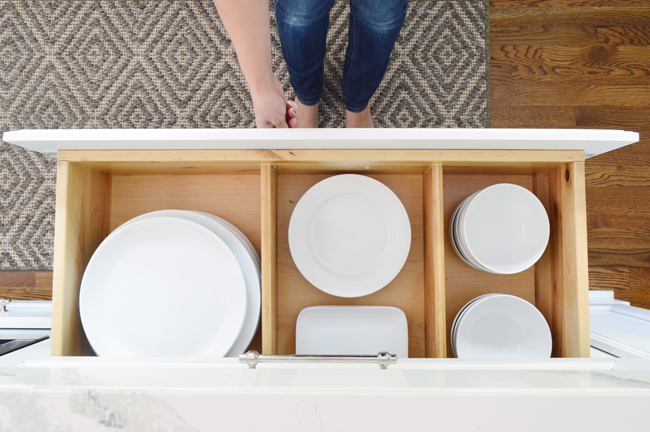
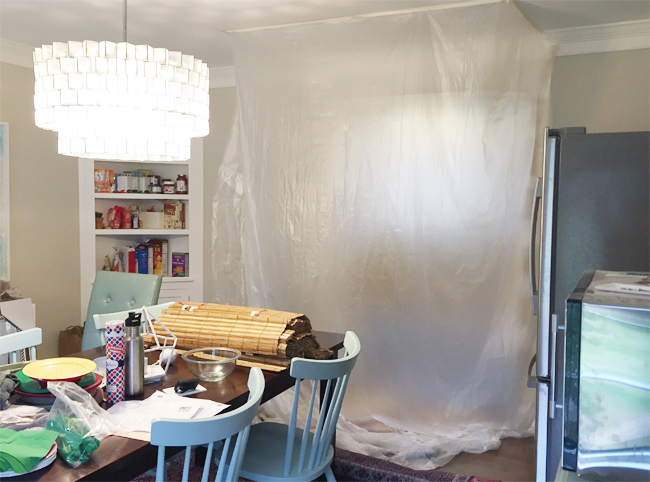
At this point, you may be wondering where all of our stuff went. Um, the dining room.
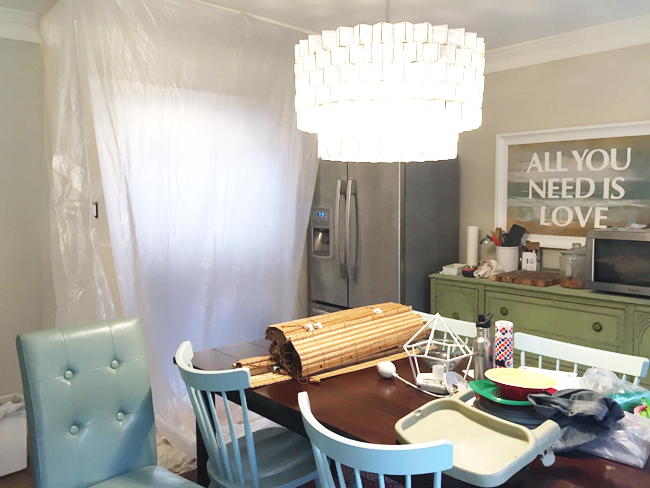
For some reason, the only photos we ever took of our makeshift kitchen occurred when we had a tarp taped up to protect it from drywall sanding dust. I guess this room wasn’t very nice to look at, so we weren’t inclined to extensively document it. But the corner shelves became our pantry and dish storage, the green buffet was our “counter” (complete with microwave) and the dining table was basically a spot for anything and everything.
The only thing worse than having to cram everything in there for a couple of weeks was MOVING IT ALL OUT again. Not like moving it back into the kitchen, but moving it completely out of the house when it came time to do the floors.
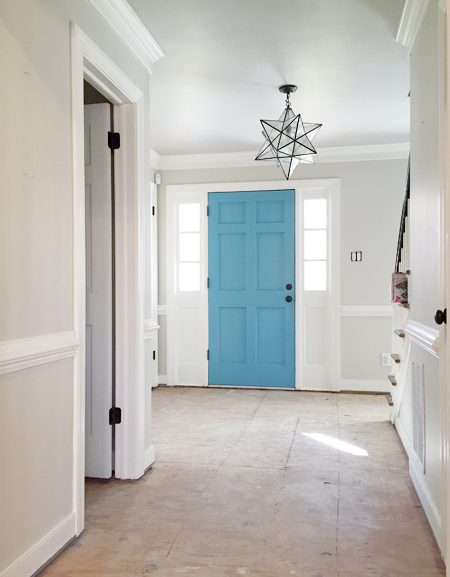
Oh the floors! Let’s talk about them. The peeling, cracking, and heavily scratched faux brick sheet of linoleum was probably our least favorite thing about the old kitchen. So getting rid of it was an easy call, as was deciding on something new. We’re suckers for hardwoods, which we had and loved in our first kitchen – plus we had them in many other rooms on the first floor here, so we knew we’d love a more unified look. But actually making hardwoods happen wasn’t so simple. Because when is moving out of your ENTIRE first floor for two weeks simple?

Long story short (we’ll give you the long version at some point) installing new hardwoods in the kitchen meant blending them seamlessly into the adjacent living and dining rooms. Which meant clearing those rooms and refinishing those floors at the same time. And if 85% of the first floor is going to be hardwood, why not go all the way? So although we had rescued the grout in our slate covered foyer and happily lived with it for years, we always secretly wished our first floor felt more seamless – rather than having soooo many flooring transitions (five, to be exact!). So yes, that’s how we found ourselves having to complete vacate the first floor. It certainly wasn’t the easy way, but it got us where we wanted to go.
Although we installed all the prefinished hardwood flooring upstairs ourselves, seamlessly blending existing hardwoods with new boards was something we felt best leaving to the pros. Luckily we knew the perfect guys thanks to our work on some local builder spec houses. So after everything came out (like the old slate floors – see above), we watched in awe as our hardwood floors were perfectly patched in.
In the photo above and below you can see how they carefully chiseled out some of the original living room boards to stagger in the new stuff. It took two guys more than three full days, so it became clear very quickly that we made the right call in hiring it out. One of the best things about it is that our entire first floor is not only all matching hardwood now, there aren’t any step ups or downs or raised transitions. It’s all exactly the same level plane. Woot!
The flooring and cabinet guys both recommended installing our cabinetry before staining the floors. Recently stained floors still need around 10 days to fully cure (before moving heavy objects like furniture/cabi
Five Tiny Houses That Could Withstand Hurricanes
Hurricane Matthew is making big news this hurricane season. Meteorologists are saying it’s the most powerful Atlantic tropical storm in nearly a decade with winds of 145 miles per hour. Granted, more than a few homes along the Atlantic coast and in the Caribbean will be destroyed by the storm. What tiny houses are best […]
Sunday, October 9, 2016
Raising a Family in a VW Bus: Tiny House on the Road
It’s September in Belize, which means the azul of the Caribbean Sea is breaking small waves from an afternoon breeze that’s finally cutting through the heat that’s been a long summer in Central America for our family. We’re five people, living, working, learning and traveling around in our 1978 VW Bus, a home that consists […]
Kitchen Remodel Chapter #1: A Totally New Layout
As many of you have already heard (either on our podcast or via the pic below that we posted on Instagram), we’ve renovated our kitchen in what turned out to be the biggest, most comprehensive renovation project that we’ve ever undertaken. It was long, it was fun, and – much like planning a wedding – we’re thrilled with the outcome, but very grateful to have it behind us. (Unlike a wedding, there was not nearly enough cake involved).
Like our living room and dining room makeovers (which we detailed in our second book), we decided to bring this renovation fully to completion before sharing it. We learned from redoing those rooms that letting go of the whole blogging-in-real-time thing keeps us focused on creating the best outcome our family, instead of being distracted by what might make the best content and stressing about a big public countdown to reveal day. It’s nice to have time to really live with a room and gradually tweak little things (and even a few big things) as opposed to racing for the camera before the dust even has a chance to settle.
Now that we’ve reached a point where we’ve lived with it for a while and it feels “finished” (said with big bold quotes because no room is ever really done – especially these shelves, which Sherry seems to rearrange every couple of weeks), there are probably a million ways we could share the whole ordeal. We have a ridiculous amount of photos and topics to cover (so many lessons learned!), but we’re thinking we can probably spill it all in a handful of posts – which isn’t too shabby compared to our other kitchen renos that took 4+ months to share across 40+ posts each. And we figured we’d toss in some finished shots as we go. Like so:
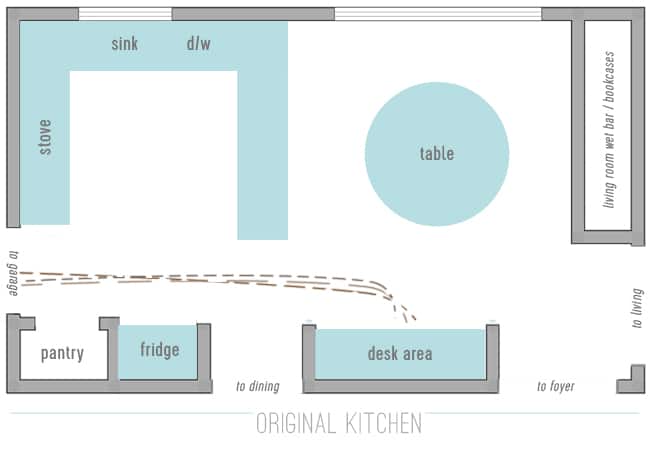
But let’s back up. Today we want to talk about planning and how we decided to totally overhaul the layout. The new floor plan is the unsung hero of the whole undertaking and in many ways it was the toughest part (it was something we mulled over pretty much from day 1 of living here). As a reminder, here’s what it looked like then:
Our “Phase 1” improvements (like removing some upper cabinets, painting the trim and paneling, new lighting, hanging some open shelves, painting the upper cabs, staining the lowers, resurfacing the laminate counters with concrete, and getting new appliances when our dishwasher died on Christmas Eve two years ago) were a nice upgrade from where we started, but we were still sorely lacking in some functional areas.
When we look at the original floor plan, it’s what our friend (a kitchen designer) described as “a perfectly nice, single chef kitchen.” Since Sherry and I don’t usually cook at the same time, we initially contemplated just leaving the layout as it was and updating the cabinets and counters. But as time wore on and our family grew, so did our needs to use the kitchen simultaneously (to make school lunches and breakfast at the same time, to occasionally bake with our daughter, etc) and it became clear that things were unnecessarily cramped and we weren’t using the space as effectively as we could.
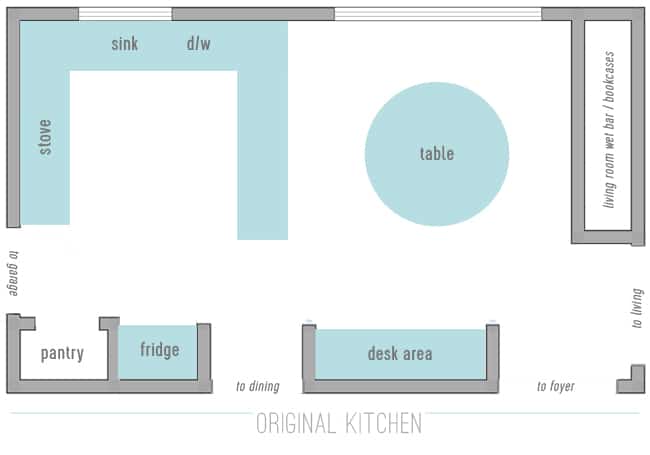
Our gripe with the layout wasn’t only about its size, it was also how closed off it felt. The person cooking felt blocked off from the table by the extra long peninsula – and walking back and forth from the stove/sink/prep area to the table during meal times felt annoyingly inefficient. I can’t begin to tell you how many times we made that trip while fielding sporadic kid requests for more OJ, food-cutting help, or the occasional hair pulling intervention.
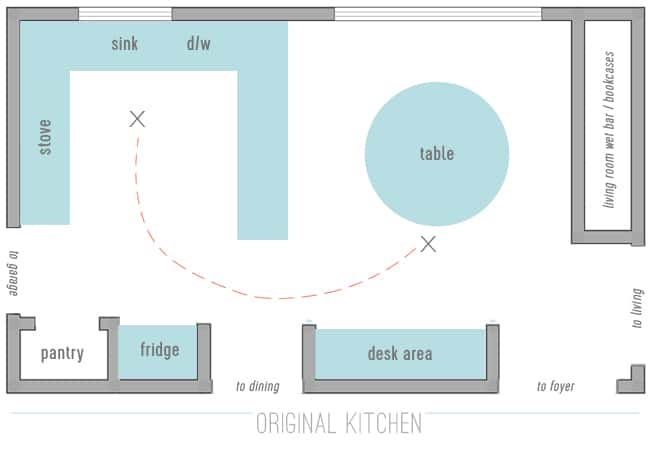
Even worse, the prep area felt MILES away from the living room (where the kids usually were during dinner making or breakfast cleanup). The wall there meant anyone working in the kitchen couldn’t see or barely hear what was going on in the living room. Whoever was in charge of dishes that night felt like they were in kitchen jail while everyone else watched TV and relaxed. So close, and yet so far. Clearly, that wall had to go.
Another functional issue we were trying to solve was our lack of a drop-zone for shoes/coats/bags (oh how we longed for a mudroom). Since we always enter from the garage door that leads directly into our kitchen, for years our solution was to walk all the way through the kitchen and into the foyer to hang bags, backpacks, and coats in a foyer closet while tossing shoes into a basket under the desk area of the kitchen.
It semi-worked for a little bit but then it started to wear on us. Having all of our shoes thrown into one basket created a bit of a jumble, so the whole basket often got dumped when searing for some elusive other shoe, or we’d get lazy and leave our shoes out right next to the basket, just waiting to be tripped over. Bags and backpacks ended up on the counter or floor. Jackets were often left on the back of kitchen chairs. Plus, that stretch of floor between the shoe basket and the garage door was always SOOOO dirty from whatever we were tracking in on our shoes. We took turns sweeping it nearly every day.
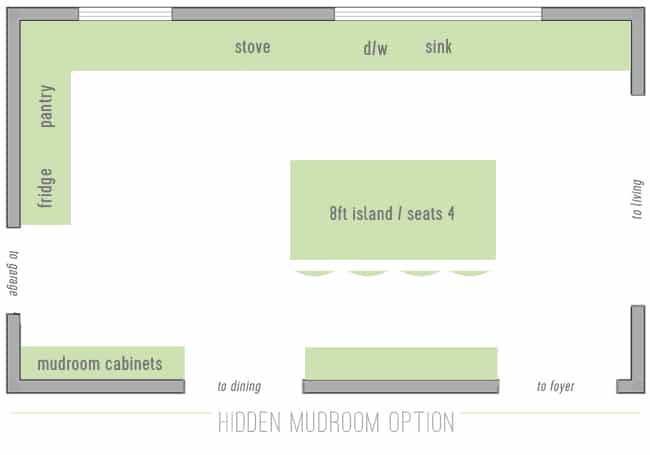
When it came time to reconfigure this room once and for all, we wanted it to work a lot harder for our family. Having shoe, bag, and coat storage a lot closer to the door was a BIG MUST. So much so that at one point we entertained the idea of basically adding a wall to create a legit mudroom and shifting all of the kitchen function closer to the living room. It would’ve looked something like this:
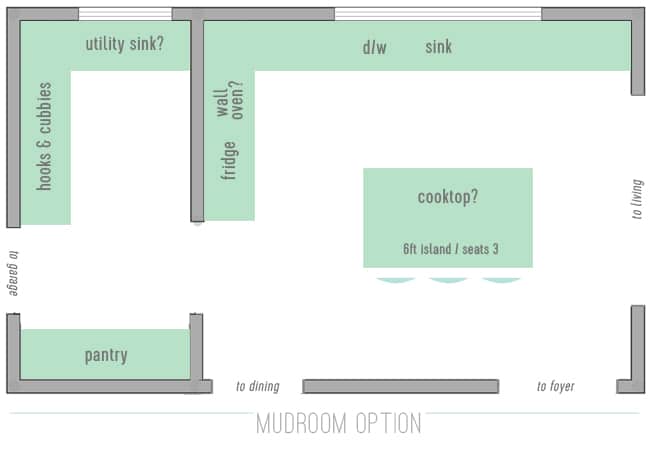
The idea of having that dedicated mudroom space was exciting, but there were some hurdles that kept making it seem impractical and cramped on the kitchen side. We didn’t love where some of the appliances would be forced to live in that situation, and while we’d be getting the island we wanted, it wouldn’t be large enough to seat all 4 of us. The kitchen would also be “losing” a window to the mudroom, and this room needs all the natural light it can get. So in the end, there were enough red flags to decide that it wasn’t the best option for us.
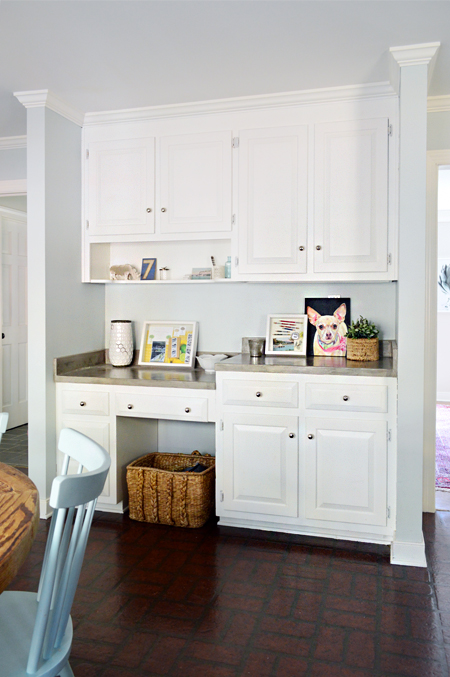
Fortunately, another solution that we picked up while shooting our second book was waiting in the wings: a hidden mudroom cabinet!
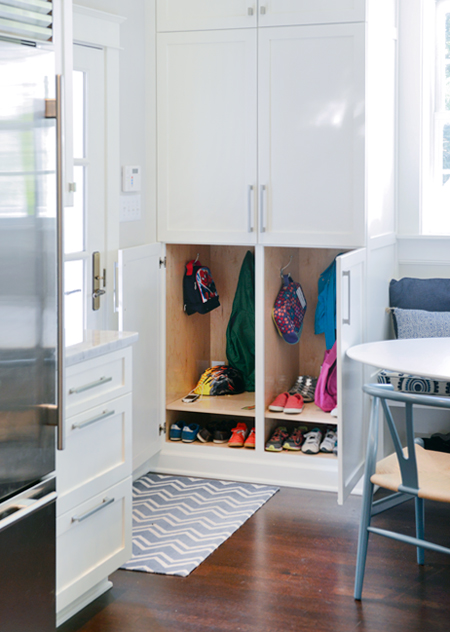
The photo above is from a family that faced a similar entry-into-kitchen issue and they solved it by building shoe and bag storage right into their cabinetry. When those floor to ceiling cabinets are closed, they blend into the rest of the kitchen cabinetry. But when the doors are flung open, they reveal a cubby for each person in the house (kid stuff on the bottom, parents on top).
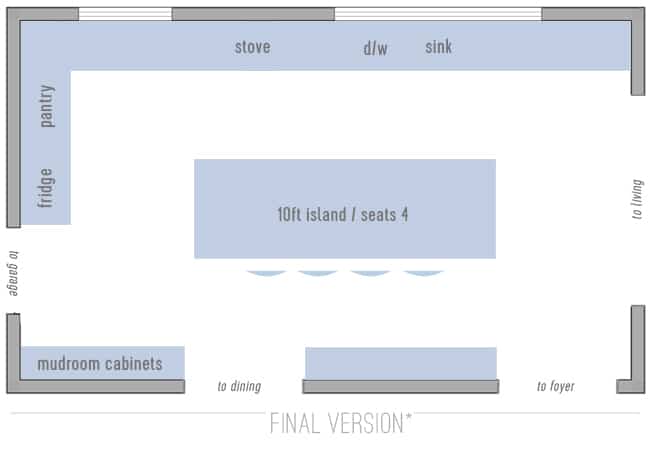
When we decided to try implementing a hidden mudroom into our kitchen, it got us to a floor plan like this:
By building mudroom function into floor-to-ceiling cabinetry right next to the door, we’d solve our shoe problem – and we’d still have plenty of space for appliances and an island that would seat all 4 of us. We’d also get our open view to the living room, and we’d even be able to widen the doorway to the dining room so that felt more connected as well. But by expanding the kitchen to fill the entire room, a normal 8ft-long island looked totally dwarfed.
The obvious answer (just make the island bigger!) wasn’t necessarily easy. Most stone materials come in 8 foot slabs, so anything larger would require a seam. We actually encountered this issue in our showhouse, which had an 11-foot island. We made the seam work okay in there, but always wished we’d been able to dodge having one.

Our solution came in the form of Cambria Quartz, which is the material we were hoping to use anyway because of how durable and low maintenance it is. We’ll talk more about it later when we share all of our material selections, but the pertinent layout fact is that they now sell 11-foot “super slabs,” which meant we could stretch the island to better fit the space, avoid having a seam, and easily accommodate 4 stools (one for each of us). Plus – like the showhouse island above – we could add some bonus base cabinets for storage on each end. Win, win, win. Enter our ten foot island, stage left.
So that’s basically where we ended up, apart from one 11th hour switch that we’ll get into later when we talk about mistakes (oh the mistakes!). You may be having the same reaction we first had: wow, that’s a big kitchen. Especially compared to the footprint that we started with. And having come out the other side we can say this: yes, it is big. But it has turned out to be a much better use of the space for us, and we’re so glad we took the time to work out the best option that checked all of the right boxes for us, like:
- significantly increasing storage and prep space (there’s a lot more of both)
- moving the main prep/sink area much closer to the eaters
- making the kitchen and living room A LOT more connected
- gaining dedicated shoe/bag/coat/backpack storage right next to the entry door
- adding an island for eating/homework/hanging out with seating for all four of us
We did worry that the work triangle (the distance between the sink, fridge, and stove) would feel too spread out, but it hasn’t bothered us at all. In fact, we’ve been able to group and store things in a way that has made our mealtime routines much more efficient. But more on that in another post. For now, we’ll leave you with two more finished shots. Here’s that “hidden mudroom” we created next to the door, which has been a total game changer for our sanity.
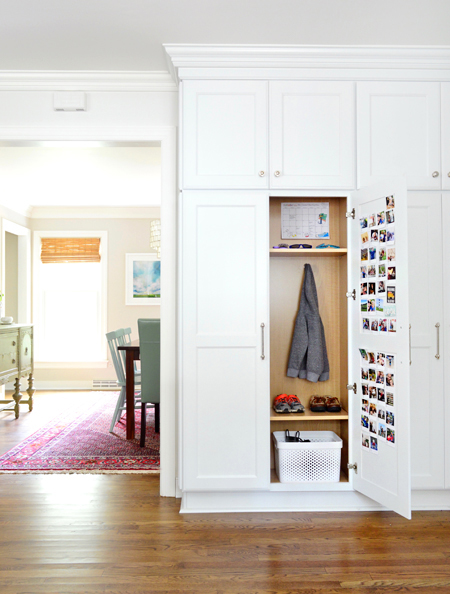
They’re just two identical, side-by-side floor-to-ceiling cabinets (each with two doors). The kids share the cabinet that’s closest to the dining room (they each get a side), and Sherry and I share the other. It’s almost like each door creates our own “locker,” complete with a personal basket for shoes, hooks for coats/bags, and a shelf up top for sunglasses, hairbrushes, keys, etc. We even added a few outlets so we can charge our devices in there. Plus we can each use the backs of our own cabinet’s door for photos, calendars, and magnet boards with reminders. In a word, it has been AWESOME.

Next up we’re gonna take you through the whole demo and reconstruction process, so get ready for some pretty gnarly photos of this room getting stripped down to nearly nothing, and built back up in a completely new way. I’m sure you have a million questions about that and everything else (again, we have a ton of info and photos to share), so hang tight and we’ll do our best to get that together for you in the next week or so. In the meantime you can find me not walking around a peninsula 68 times per morning. Hallelujah.
P.S. – If you’re wondering what wall colors we used in any room, or where we got something (a rug, lighting, furnishings, etc) we created this page for you with all of that info.
The post Kitchen Remodel Chapter #1: A Totally New Layout appeared first on Young House Love.
Subscribe to:
Posts (Atom)