The Music Box house, in the sun-dappled woods of the Pacific Northwest. It is a new design, and is fresh out of the Zyl Vardos workshop. 24′ long, 8.5′ wide, 14′ high. The stained glass in this one is gorgeous and was crafted by the owner. Bed is on the ground floor (no loft) and
Sunday, July 31, 2016
Saturday, July 30, 2016
Living in a Yurt in the Forest in New Zealand
We have lived in a yurt two years now. I heard last night that the mind is a ‘discounting muscle’ – it’s a survival technique; we minimalise big, important things over time in order to cope. For example, when humankind used to live a treacherous hunter-gather life, if we spent our whole time being blown
Friday, July 29, 2016
Behind The Scenes Of Blogging For Business
Since we’ve heard from so many of you who are enjoying the peek behind the scenes of the blogging business in this week’s podcast episode (so glad!) we thought we’d point you guys to another resource on that subject: our 3-part series on how to start a blog, grow your audience, and earn money.
It’s something we actually wrote a few months ago, mostly to have a single spot to send anyone who asked about it (it’s one of the most frequent questions we get asked, even to this day). But since we never published it to everyone’s feeds as an actual blog post, it’s admittedly not the easiest thing to find, and we realized most of you probably haven’t even seen it. So for anyone who wants to dive in, just click this link or the image below.

And if you still haven’t caught this week’s podcast episode (#8), we had a blast talking to Emily Henderson, Justina Blakeney, and Nicole Balch about sponsored posts. Paid content is a big part of the blogging world these days, both for blog writers and blog readers. So we had a candid chat with these three professional design bloggers, and they cleared up some misconceptions by peeling back the curtain on topics like negative feedback, transparency, and yes, even how much money there is to be made. We’re so grateful to Emily, Justina, and Nicole for their honesty and we learned A LOT.

Psst – For any podcast newbies, there’s a detailed tutorial for getting started here. It just takes a few clicks and it’s free!
The post Behind The Scenes Of Blogging For Business appeared first on Young House Love.
5 Tiny Homes for Sale in Amazing Places You Can Buy Now
One of the cool things about the tiny house movement is that our community is working worldwide to show off how awesome downsizing can be. Check out these small homes in amazing places around the United States. 1. Morel, the Sustainable Tiny Cottage Price: $32,500 Square Footage: 250 Location: Rutledge, Missouri Morel is an excellent
Thursday, July 28, 2016
Freedom from the Matrix with Brad Kittel
Driven by loss and a deep-seated desire to educate us all about waste and environmental hazards of irresponsible living, this week, Brad Kittel from Tiny Texas Houses shares his story. Tune in to hear how Pure Salvage Living got it’s start, about his not-so-tiny salvage outpost in Texas where you can find enough materials to
Wednesday, July 27, 2016
ClimateRight Builds A Small Unit For A Tiny House
A couple of weeks ago I made a little video. What’s new about that, you ask? Well, the video was an installation video of a product I feel is completely overlooked by the tiny house community. In fact, I hate even calling it a product because here in the Southeast it is as essential as
Monday, July 25, 2016
Blossman Tiny House Powered Totally by Propane
Blossman Gas is the eighth largest propane company in the United States and they have just built a 152 sq. ft. tiny house powered completely by propane. The house was developed as a propane education tool and is now on a 73 store community tour in the Southeast and Mid-Atlantic area of the U.S. The
Friday, July 22, 2016
10 Small Houses for Sale in Pennsylvania
Check out these ten awesome tiny houses for sale in the Keystone State. 10. Modern Off-Grid Tiny House on Wheels Price: $39,000 Square Footage: 150 Location: Cochranton Nothing says freedom quite like a tiny house-on-wheels that’s also equipped to meet all of your needs off-grid. This one is built on a 20’ trailer, and still
Thursday, July 21, 2016
Running Away and Finding Supernatural Courage with Bryan and Jen Danger
There’s a man (and woman) who leads a life of danger To everyone he meets he stays a stranger With every move he makes Another chance he takes Odds are he won’t live to see tomorrow Secret Agent Man Secret Agent Man They’ve given you a number and taken away your name (Johnny Rivers) Inspired
Wednesday, July 20, 2016
Where Do You Get Furniture For Your Tiny House
The traveler – strong, yet exhausted from his trek – looked up from the outpost where he had slept a few hours to half protect himself from the pounding snow of the region and half to rest his now-aching joints. He focused hard on a collection of jagged rocks that stood in formation some three
Tuesday, July 19, 2016
The Perfect Tiny House Accessory: A DIY Wood-Fired Hot Tub
A young couple in Idaho has been living the dream. After leaving their jobs in the city, Jesse and Alyssa moved deep into the mountains with the goal of constructing an off-grid homestead from the ground up. Right now they are almost one year into their adventure and are making enormous progress. They have built
Monday, July 18, 2016
Self Sufficient Cottage in the Netherlands
Netherlands tiny house pioneer, Marjolein, in partnership with Walden Studio and Tiny-House.nl has recently finished a beautiful, innovative tiny house that is totally off-grid. The tiny house movement in the Netherlands is just picking up steam, but the country is embracing tiny houses in a big way. The 215 square foot house has a simple sitting
Sunday, July 17, 2016
RV Turned Tiny House
A few months ago, my husband and I sat down to write out a budget. He recently returned to school and with two young kids at home, funds were tight, to say the least. We quickly realized that our housing expenses were too high, even though our rent was surprisingly low for the area. We
Turning Race Medals Into Christmas Ornaments (It’s Ridiculously Easy)
Sometimes when we mention some random side-note-y thing, that little aside surprises us by becoming the thing people want to know about more than anything else we’ve said. Take this cheeseball picture that we posted after John’s third triathlon almost two months ago on Instagram and Facebook, with the caption: “Third triathlon complete for this beast (and yes, we make Christmas ornaments for our tree from his medals, because we are nerds).”

Well, we were completely surprised by how many of you guys commented about that little ornament tidbit and asked for instructions/photos/a blog post. So I’m here a mere two months later with the didn’t-ever-think-you’d-be-interested-but-I’m-game-if-you-are goods. There’s nothing like a little Christmas tutorial in July, eh?
The good news is that it’s so simple and quick that you can even do it while intently watching the Bachelorette and trying to tell the guys apart (ARE ROBBY AND CHASE THE SAME PERSON? I’M SO CONFUSED).

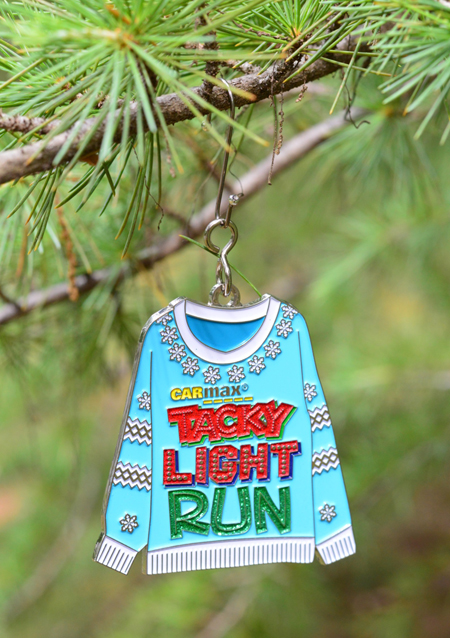
We first got the idea when John did a “Tacky Light Run” a few Christmases ago. They’re fun night runs in a nearby neighborhood that goes INSANE with holiday decorating, and the medals they give out at the end basically look like ornaments. Although they come on the same thick ribbons that you see in the photo above, it was enough to plant the “hey, we should hang this puppy on our tree!” idea. And it was only a matter of time before it trickled over into the rest of John’s medal stash.
So here are the suuuuuuuper complicated steps:
Step 1: Gather all of the medals and double check with the person who won them that they don’t mind you altering them. John is a-ok with the conversion since otherwise they’d just live in a box in the back of the closet.
Step 2: Cut the ribbon that’s threaded through the medal, freeing it up for some thinner ribbon that you’ve purchased (or hoarded from decades of Christmas present unwrapping like I have).
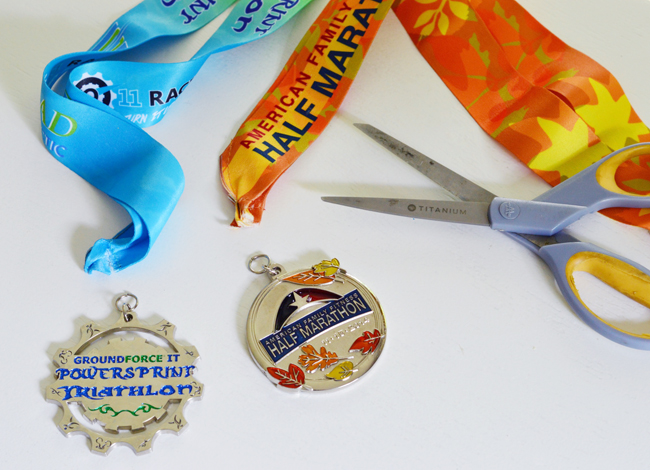
Step 3: Cut a short strip of your hoarded/purchased ribbon (we make ours about 7″ long), loop it through the medal where the old ribbon had been, and secure it with a nice tight double knot.
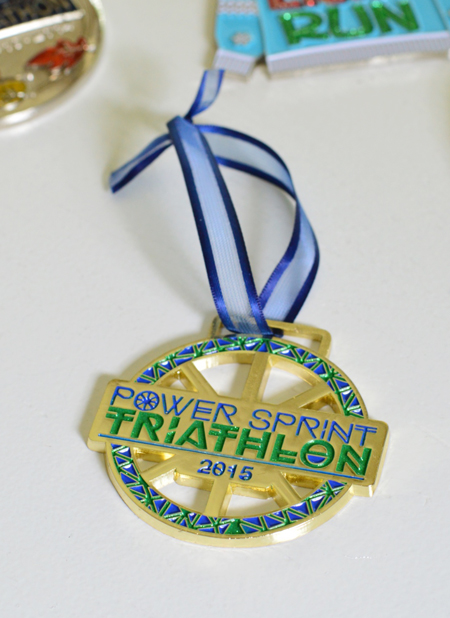
Step 4: Admire your creations. Consider calling yourself some name that sounds like the long lost cousin of a super crafty person (Bertha Stewart is a personal favorite of mine).
Step 5 (optional): Walk around outside until you encounter a pine tree that resembles a Christmas tree because it’s summer and you’re not about to set up your artificial tree for an impromptu ornament photoshoot. Wink at your neighbors knowingly (who hasn’t hung ornaments outside in the summer with their good camera on hand, amiright?).

Bonus option: If a metal ornament hook is more your speed, you can just loop one through the hoop on your medal (this can be accomplished faster than I can eat an 8-count of chicken nuggets, which only takes me like 2.5 seconds). Pottery Barn and craft stores like JoAnn usually sell hooks that are slightly thicker than the cheap paper-clip-looking options, which I actually got suckered into buying a few years back from PB. In their defense, they’re pretty cute, and I’m 87% sure they were worth the $9 I spent on them.
So that’s it. Easy, right? I have a few athletic friends who could fill an entire tree with medals. Heck, I could do it too if speed chicken nugget eating was worthy of a medal. #dreambig
Psst- We’re no strangers to ornament tutorials around these parts, so here’s one about making them from wood slices, here’s another about glittered & feathered glass ones (woof, those old pics from 2008…), and here’s one about how we whipped up 38 different homemade ornaments for our tabletop tree. Oh and if you haven’t tuned into our latest podcast episode with Tiffani Thiessen (she was so nice & even played a little “Saved By The Paint Colors” game with us), you can find more info & learn “how to do podcasts” here.
The post Turning Race Medals Into Christmas Ornaments (It’s Ridiculously Easy) appeared first on Young House Love.
Friday, July 15, 2016
10 Tiny Houses for Sale in Oregon
Ready to live the tiny house lifestyle of your dreams in the Beaver State? Check out these ten small homes available right now in Oregon! 10. The Tiny Log Cabin on Wheels Price: $18,500 Square Footage: 145 Location: Albany This authentic little log cabin is ideal for someone who wants to rough it on the
Thursday, July 14, 2016
From Film School to Love and Back Again with Alexis & Christian
Not so long ago, two people met, fell in love, and decided to travel around the country filming a documentary about tiny houses. (Isn’t that how ALL road trips start?) If you’re a sucker for a romantic story, intrigued by unique people, are interested in learning more about how to find successful avenues for legal
Wednesday, July 13, 2016
Make Your Tiny House Feel Bigger With Paint And Color
I. Love. Color. No, that is a lie. I prefer black. Yes, the absence of all colors. No. That isn’t true either. Okay, here is the scoop. I love color but in this secret little room in my soul I desire to be like Johnny Cash, wearing only black. I like the thought of it
Tuesday, July 12, 2016
Dee Williams Downsizes from Tiny to Tinier!
Fans of tiny house blog are probably already open to small home living, but how small is too small? And is “too small” a number, or a feeling? Dee Williams is fixing to answer those questions by downsizing…from the 84 square foot tiny house she’s lived in for 13 years, to a 56 square
Monday, July 11, 2016
Flat Pack Tiny House on Etsy
When you think of Etsy, you usually think of handmade jewelry and clothing, antiques and vintage items. Now you can also buy a tiny, flat-pack house built by Jacob Triche of the Revival Supply Co. shop on Etsy. This very tiny home only comes in at 96 square feet but it’s capable of fitting inside
Sunday, July 10, 2016
My Tiny House Is My First Step Into Entrepreneurship
I remember hearing different things about tiny houses, but never had actually seen one. I happened to be looking for something on Craigslist to remodel my current small, but not “tiny” house, and came across a tiny home for sale. I remember showing it to my husband and commenting, “This would be a great opportunity
Friday, July 8, 2016
10 Tiny Houses For Sale In Florida You Can Buy Now
Ready to go on permanent vacation? Check out these tiny houses for sale in the Sunshine State! 10. The Stella Blue House Boat Price: $29,900 Square Footage: 300 Location: St. Petersburg If you’ve always dreamed of sailing off into this sunset, this tiny house on fins could be your ticket to the high seas. It’s
Thursday, July 7, 2016
Living Always Tiny, Always Minimal With Vina Lustado
So many of us have many fond memories of a “simpler time” and Vina is no exception. She remembers her Grandparent’s coconut farm in the Philippines and those memories have shaped the simple way of life she now embodies. Dissatisfied with her job, and in an attempt to capture her philosophy around sustainability in her
Wednesday, July 6, 2016
Evolution Of A Room, Girl’s Bedroom Edition
Who’s ready for the coming of age tale of a girl room, just finding its own way in this big beautiful world? Growing, changing, and living life without regrets and a whole lot of heart (*cue the romantic comedy music*). I think Reese Witherspoon should play the room.
Some recent updates to our daughter’s room made us realize that this space has undergone quite the evolution since we moved in three years ago. And much like we took you through the evolution of our last house’s master bedroom, we thought it would be fun to do that in here. We’re big subscribers to the whole “if at first you don’t succeed, try try again… and again, and again” concept when it comes to cracking that how-do-we-want-this-room-to-look-and-function puzzle. And the added element of a space that’s evolving to fit the changing needs of a then 3-year-old to a now 6-year-old is pretty fun to look back on.
So let’s go back in time for a bit, shall we? Here’s what the room looked like when we bought the house, complete with periwinkle blue trim and old wall to wall carpeting.
Before we moved in we ripped up the carpet…
…. sprayed all the baseboards & doors white…
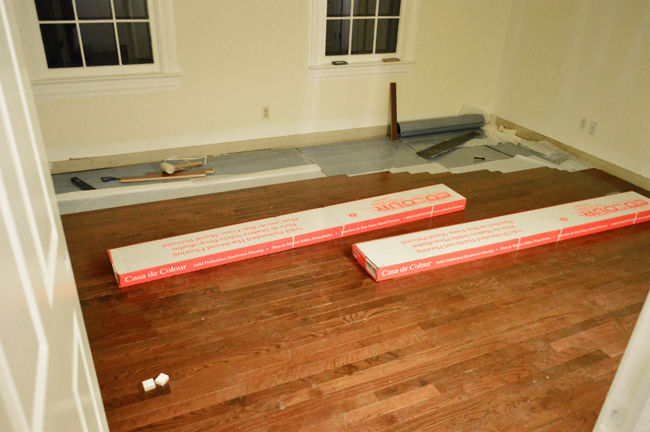
…and installed hardwood floors.
On the day we moved in, we basically just dropped in all of our existing furniture and it stayed like this for a little while (check out that paint overspray from the doors on the walls).
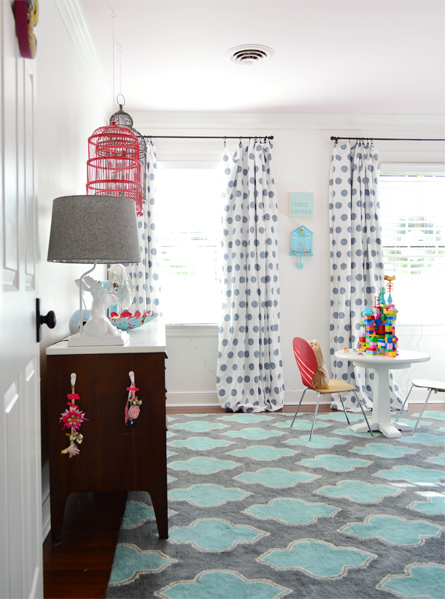
Eventually, we painted the room white with a soft pink ceiling and made a few other quick swaps (the afternoon sun was so bright in here it bounced off the rug and the whole room glowed hot pink, so we brought in a blue rug we had on hand instead). We also tried some other patterned curtains we already owned, just to give them a whirl in here.
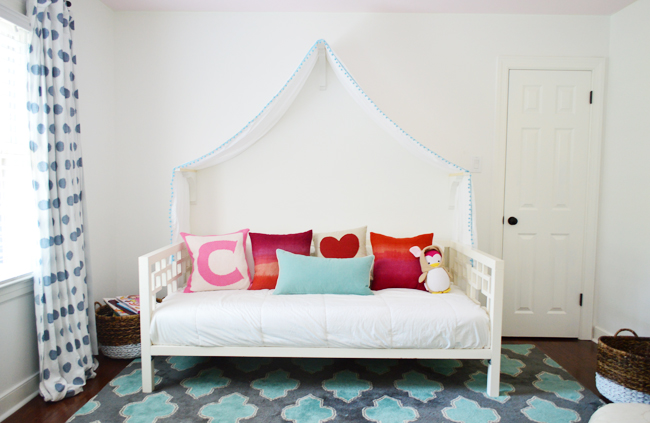
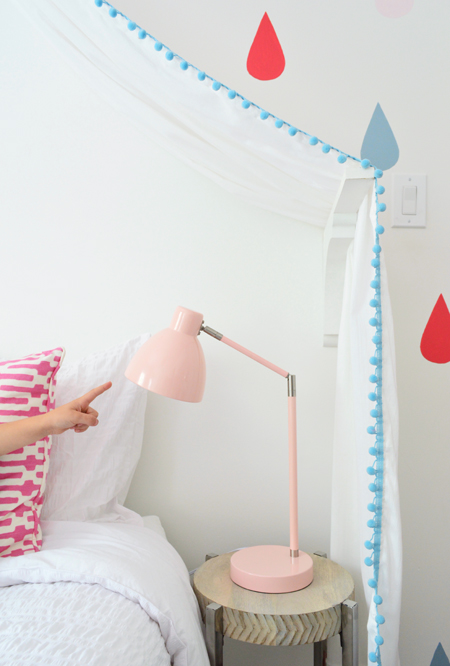
Next, we added a simple little fabric canopy over her daybed using store-bought brackets and fabric with blue pom-pom fringe sewn along one side (tutorial here).
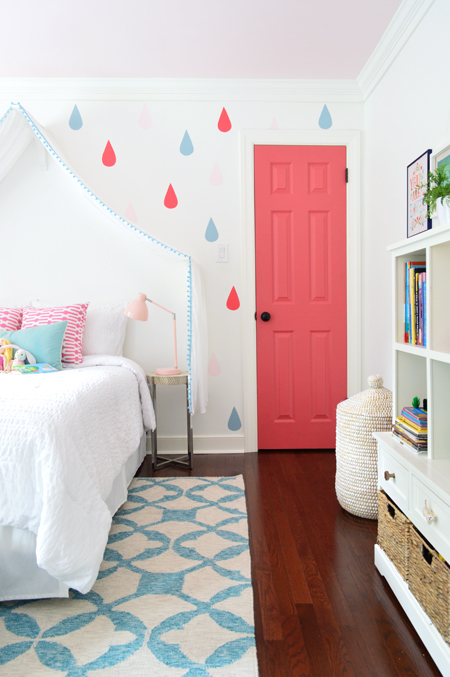
Then came the crown molding that we installed (here’s how we made it extra beefy), along with a bold pink closet door and some colorful raindrops on the wall, just for fun (here’s the full rundown on how we did that with paint colors, steps, etc).
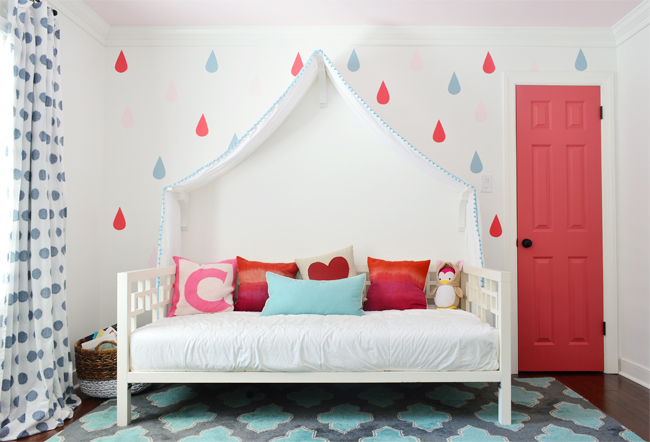
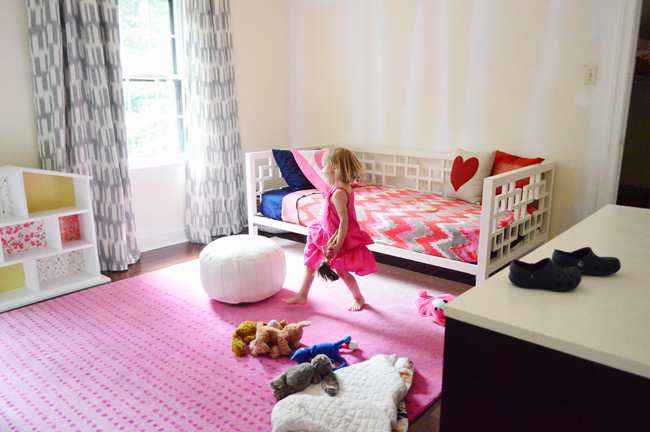
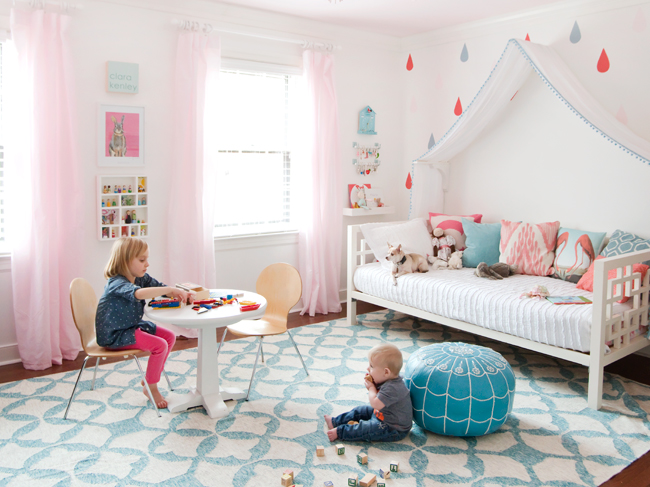
Then came a third rug since the navy/teal one always felt a smidge too large. This new one – which we originally used in our living room – was a great replacement after we found a big turkish rug for down there. The lighter color on the floor inspired the breezier curtains that I dyed pink (more on that in a bit). So for the last 18 months or so it had looked like this (this photo was taken for our second book, Lovable Livable Home):
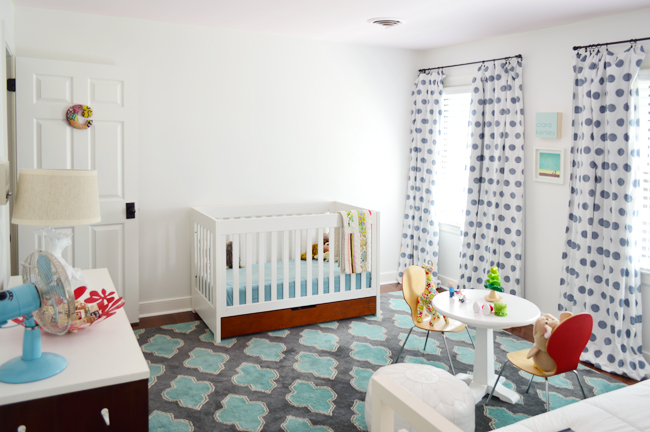
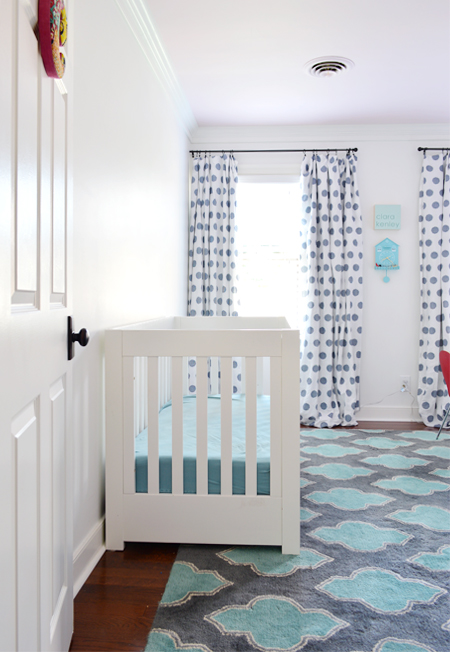
Now let’s turn our attention to the other side of the room. It initially looked like this, since she still slept in a crib for the first several months that we lived here. We expected her to make the transition to a bed long before our move (we had a daybed set up and waiting for her in our last house), but she surprised us all by happily sleeping in a crib until she was three and a half!
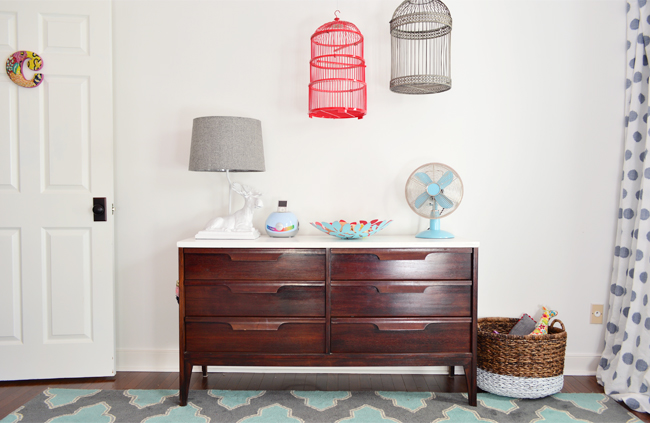
Once the crib was no longer needed we moved her dresser over there, which was a piece of furniture that we refinished to act as a changing table for her original nursery in our first house. It has served her well for all 6 years of her life and transitioned pretty seamlessly. We hope it’s still going strong when she’s a teen (three cheers for old furniture that’s built to last).
It also probably bears mentioning that this wall served as a demonstration surface for a stenciling project that we detailed in our second book. We loved how it turned out, but it didn’t exactly go with the raindrops on the opposite wall, so we let Clara decide which wall she wanted to keep (she voted raindrops, so the stencils got painted over).
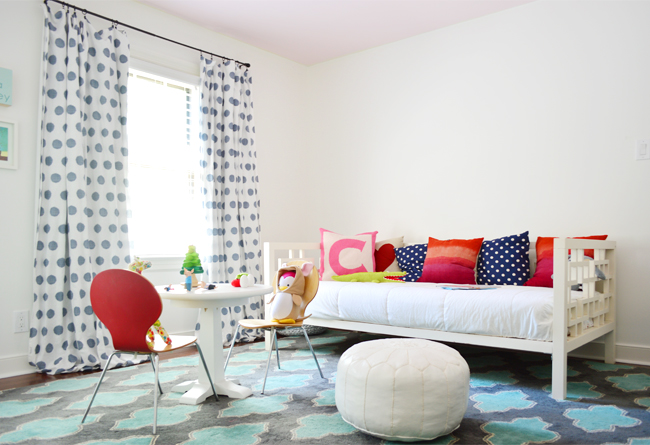
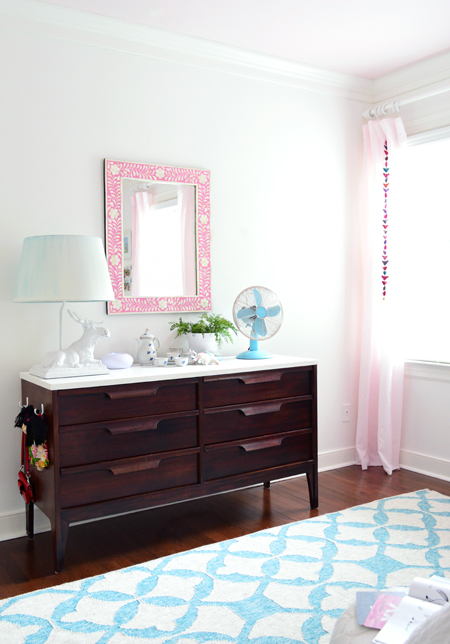
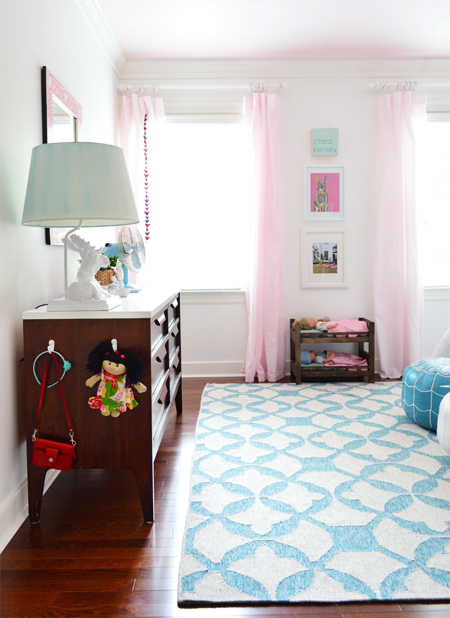
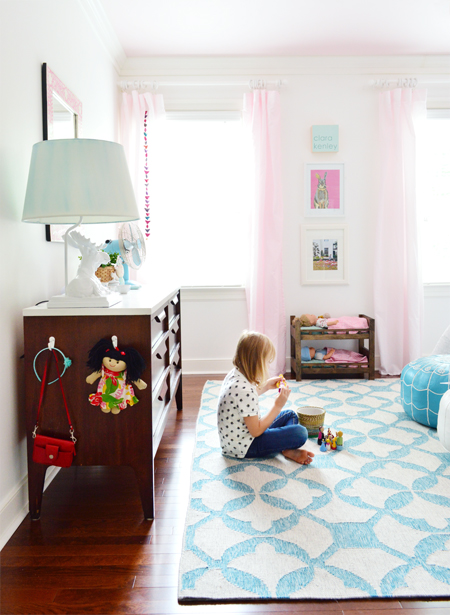
These days it’s looking a bit more like this. The dresser’s still there, but with the new rug and a little lampshade update (I painted an old white one we had with a soft watercolor technique – just completely wetting the fabric with a paint brush first and lightly brushing some light blue fabric paint on it). We also added a fun pink mirror that Clara and I were both too enamored with to pass over.
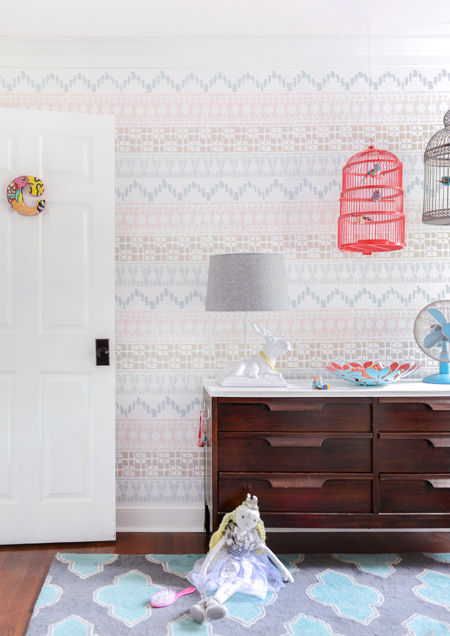
And here’s a look at the evolution of this wall, as seen from the doorway. Starting with the crib…
…to the dresser…
…and now, a couple of years later, with all of our tweakity-tweak-tweaks. (Sidenote: how cute is that doll bunk bed we made this past Christmas? It’s hilarious to see different things get tucked in each night, like trucks, drawings, and paper towel tubes with faces drawn on them.)
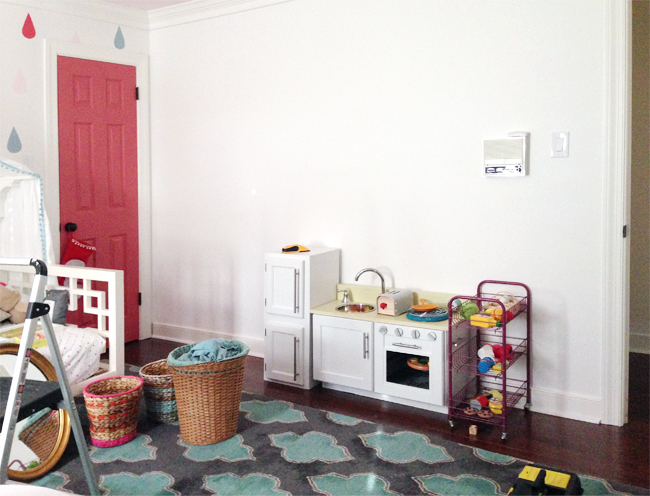
The other main wall is the one next to the door, which also underwent its own old gradual transformation. Once the dresser moved to the wall where the crib was, it became home to her play kitchen and fridge…
… which eventually got an upgrade with art, shelves, and a mirror.

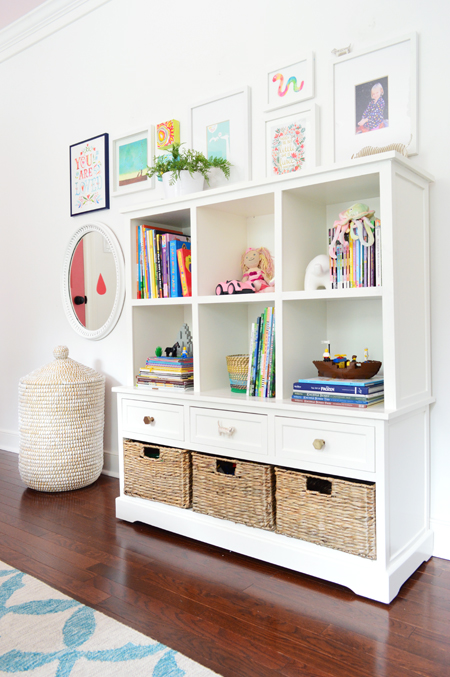
As her need for book/toy storage grew, we used a mudroom bench and constructed a grid of cubbies on top (another project featured in our second book). The drawers store dolls and doll clothes, the baskets are filled with Legos, and the open storage up top is for books and other random play things.
And finally, the latest change has been the transition to a full sized bed, which was actually initiated by our girl herself. If we’re being honest, we were a little resistant to the whole bed swapping idea (funny how chronic room-tweakers like us can fear change sometimes). We dive deeper into the reasons we came around to it AND the design lesson it helped us learn in this week’s podcast episode (#5: The Rug Crime We Didn’t Realize We Were Committing), which you can listen to on iTunes, Google Play, or Stitcher. And if you need help getting started with podcasts (they’re easy and free!), this post will walk you through it.
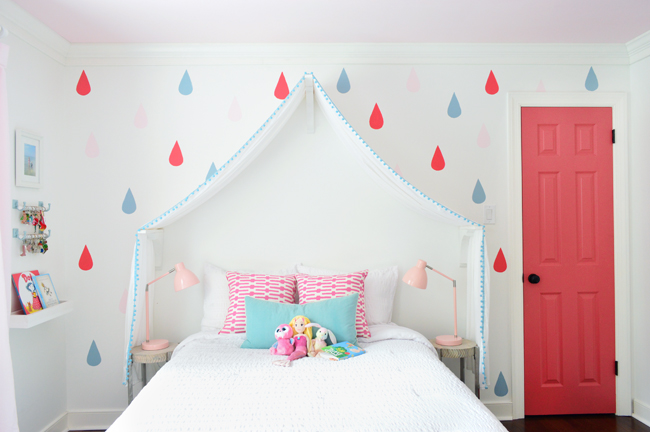
We also added some new side tables and pink touch lamps, both snagged on a 20 minute run through Target in hopes of surprising her with the new set-up before she returned home from school one day last month. She loves tapping them on every morning and off at bedtime with a flick of the wrist.
Oh and back to the curtains. They were just simple white Ikea curtains that I dyed a soft pink color by filling the tub with water and adding only half of the powder in one packet of Petal Pink RIT dye, and putting all four panels in there to soak for around 5 minutes. Just using half a packet along with so much water for all four panels made it a light whisper pink tone, which looks really nice with the pink ceiling and the white walls. Not too bold, but still cute and playful – especially with a little $6.99 strand of birds that we hung on one side. We also bought some chunky white wood curtain rods (from Home Depot or Lowe’s – can’t remember) because the dark bronze rods we had in there before were feeling heavy.
We put the white pouf and the blue pouf that seem to migrate around our house at the foot of the bed to help Teddy & Burger hop up for snuggle time (you can see them in the pic above). And for anyone looking for other items in the room, here’s the pink bunny print on the wall (seen above) and similar pillows,
Using Outdoor Fabrics For Your Tiny House
I will admit that I am not the style maven of indoor…or outdoor furniture for that matter. In fact, I probably take furniture more for granted than anyone else. Take my home recliner for instance. I come in, plop down in it, drop a few things in its cracks, scratch on it with anything in
Tuesday, July 5, 2016
Llamalopolis, an Urban Tiny Living Oasis
Ten thousand miles into our exploratory tiny house road trip, we found ourselves in the infamous Sin City. Along with the dancing neon lights and innumerable casinos, downtown Vegas hosts many bustling small businesses, especially at the magnificent Container Park, countless brightly colored murals and seen strolling down streets are locals and tourists alike, even families. The
Monday, July 4, 2016
2016 Tiny House Plan Bundle Sale
Happy 4th of July! Tiny Houses and Independence Day go together like a hot dog in a bun (pardon the analogy). To help celebrate We’re running our once a year sales event for just five days. The sale will end promptly on Saturday, July 9th at 12 Noon Pacific. Last year we offered the original
Building a tiny house community? Anaïd Productions wants your story.
Anaïd Productions in North Vancouver, BC is on the search for groups of friends who are in the early stages of creating and building their own tiny house community. The show will focus on communities that are utilizing a communal building and surrounding it with individual dwellings. These can include various types of alternative dwelling
Evolution Of A Room, Girl’s Bedoom Edition
Who’s ready for the coming of age tale of a girl room, just finding its own way in this big beautiful world? Growing, changing, and living life without regrets and a whole lot of heart (*cue the romantic comedy music*). I think Reese Witherspoon should play the room.
Some recent updates to our daughter’s room made us realize that this space has undergone quite the evolution since we moved in three years ago. And much like we took you through the evolution of our last house’s master bedroom, we thought it would be fun to do that in here. We’re big subscribers to the whole “if at first you don’t succeed, try try again… and again, and again” concept when it comes to cracking that how-do-we-want-this-room-to-look-and-function puzzle. And the added element of a space that’s evolving to fit the changing needs of a then 3-year-old to a now 6-year-old is pretty fun to look back on.
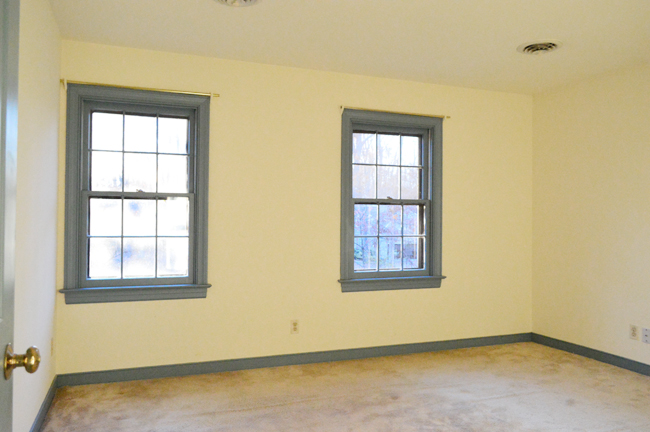
So let’s go back in time for a bit, shall we? Here’s what the room looked like when we bought the house, complete with periwinkle blue trim and old wall to wall carpeting.
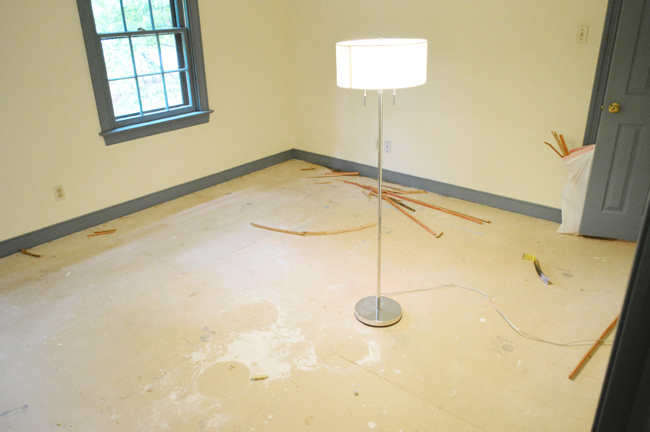
Before we moved in we ripped up the carpet…
…. sprayed all the baseboards & doors white…
…and installed hardwood floors.
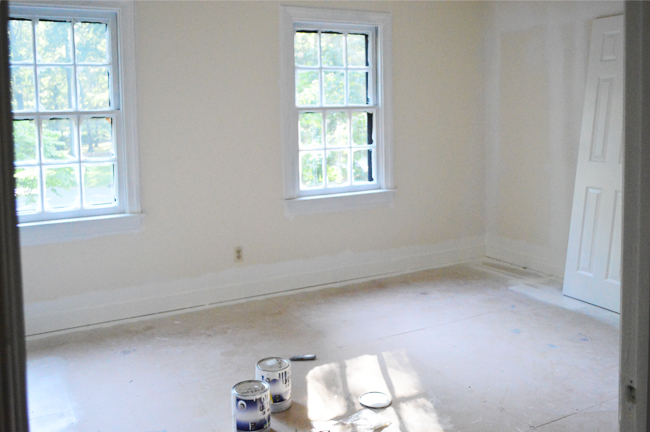
On the day we moved in, we basically just dropped in all of our existing furniture and it stayed like this for a little while (check out that paint overspray from the doors on the walls).
Eventually, we painted the room white with a soft pink ceiling and made a few other quick swaps (the afternoon sun was so bright in here it bounced off the rug and the whole room glowed hot pink, so we brought in a blue rug we had on hand instead). We also tried some other patterned curtains we already owned, just to give them a whirl in here.
Next, we added a simple little fabric canopy over her daybed using store-bought brackets and fabric with blue pom-pom fringe sewn along one side (tutorial here).
Then came the crown molding that we installed (here’s how we made it extra beefy), along with a bold pink closet door and some colorful raindrops on the wall, just for fun (here’s the full rundown on how we did that with paint colors, steps, etc).
Then came a third rug since the navy/teal one always felt a smidge too large. This new one – which we originally used in our living room – was a great replacement after we found a big turkish rug for down there. The lighter color on the floor inspired the breezier curtains that I dyed pink (more on that in a bit) too. So for the last 18 months or so it looked had looked like this (this photo was taken for our second book, Lovable Livable Home):
Turning our attention to the other side of the room: it initially looked like this, since she still slept in a crib for the first several months that we lived here. We had expected her to make the transition to a bed long before our move (we had a daybed set up and waiting for her in our last house), but she surprised us all by happily sleeping in a crib until she was three and a half!
Once the crib was no longer needed we moved her dresser over there, which was a piece of furniture that we refinished to act as a changing table for her original nursery in our first house. It has served her well for all 6 years of her life and transitioned pretty seamlessly. We hope it’s still going strong when she’s a teen (three cheers for old furniture that’s built to last).
It also probably bears mentioning that this wall served as a demonstration surface for a stenciling project that we detailed in our second book. We loved how it turned out, but it didn’t exactly go with the raindrops on the opposite wall, so we let Clara decide which wall she wanted to keep (she voted raindrops, so the stencils got painted over).
These days it’s looking a bit more like this. The dresser’s still there, but with the new rug and a little lampshade update (I painted an old white one we had with a soft watercolor technique – just completely wetting the fabric with a paint brush first and lightly brushing some light blue fabric paint on it). We also added a fun pink mirror that Clara and I were both too enamored with to pass over.
And here’s a look at the evolution of this wall, as seen from the doorway. Starting with the crib…
…to the dresser…
…and now, a couple of years later, with all of our tweakity-tweak-tweaks. (Sidenote: how cute is that doll bunk bed we made this past Christmas? It’s hilarious to see different things get tucked in each night, like trucks, drawings, and paper towel tubes with faces drawn on them.)
The other main wall is the one next to the door, which was undergoing its own old gradual transformation too. Once the dresser moved to the wall where the crib was, it became home to her play kitchen and fridge…
… which eventually got an upgrade with art, shelves, and a mirror.
As her need for book/toy storage grew, we used a mudroom bench and constructed a grid of cubbies on top (another project featured in our second book). The drawers store dolls and doll clothes, the baskets are filled with Legos, and the open storage up top are for books and other random play things.
And finally, the latest change has been the transition to a full sized bed, which was actually initiated by our girl herself. If we’re being honest, we were a little resistant to the whole bed swapping idea (funny how chronic room-tweakers like us can fear change sometimes). We dive deeper into the reasons we came around to it AND the design lesson it helped us learn in this week’s podcast episode (#5: The Rug Crime We Didn’t Realize We Were Committing), which you can listen to on iTunes, Google Play, or Stitcher. And if you need help getting started with podcasts (they’re easy and free!), this post will walk you through it.
We also added some new side tables and pink touch lamps, both snagged on a 20 minute run through Target in hopes of surprising her with the new set-up before she returned home from school one day last month. She loves tapping them on every morning and off at bedtime with a flick of the wrist.
Oh and back to the curtains. They were just simple white Ikea curtains that I dyed a soft pink color by filling the tub with water and adding only half of the powder in one packet of Petal Pink RIT dye, and putting all four panels in there to soak for around 5 minutes. Just using half a packet along with so much water for all four panels made it a light whisper pink tone, which looks really nice with the pink ceiling and the white walls. Not too bold, but still cute and playful – especially with a little $6.99 strand of birds that we hung on one side. We hung the curtains on chunky white wood rods (from Home Depot or Lowe’s – can’t remember) because the dark bronze rods we had in there before were feeling heavy.
We also put the white pouf and the blue pouf that seem to migrate around our house at the foot of the bed to help Teddy & Burger hop up for snuggle time. And for anyone looking for other items in the room, here’s the pink bunny print on the wall (above) and similar pillows,
Subscribe to:
Posts (Atom)